This sample uses VBA to take values in column A to generate QR Code barcodes using the ByteScout BarCode SDK library.
This demo uses VBA so if you have it disabled please temporarily enable by going to Tools – Macro – Security.. and changing the security mode to “Medium” to Ask if you want to enable the macro or not. Then close and reopen this Excel document.
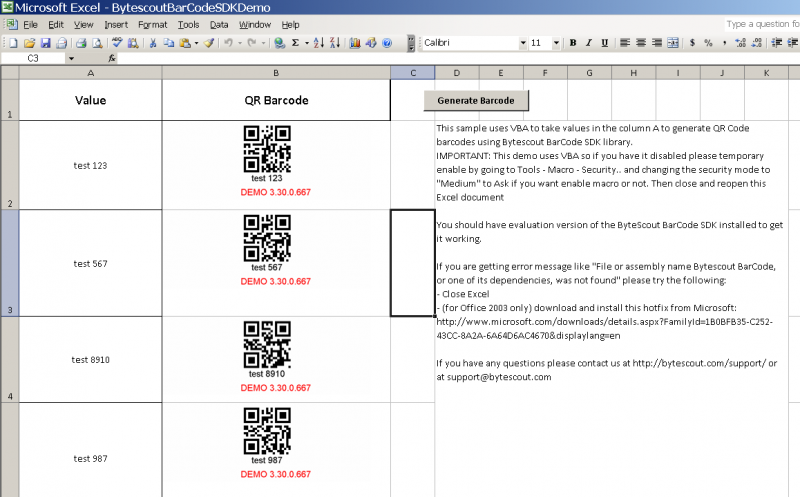
You should have an evaluation version of the ByteScout BarCode SDK installed to get it working.
If you are getting an error message like “File or assembly name Bytescout BarCode, or one of its dependencies, was not found” please try the following:
You may find this XLS file demo in the evaluation version of the SDK in ByteScout SamplesBarCode SDKMS Excel sub-folder.
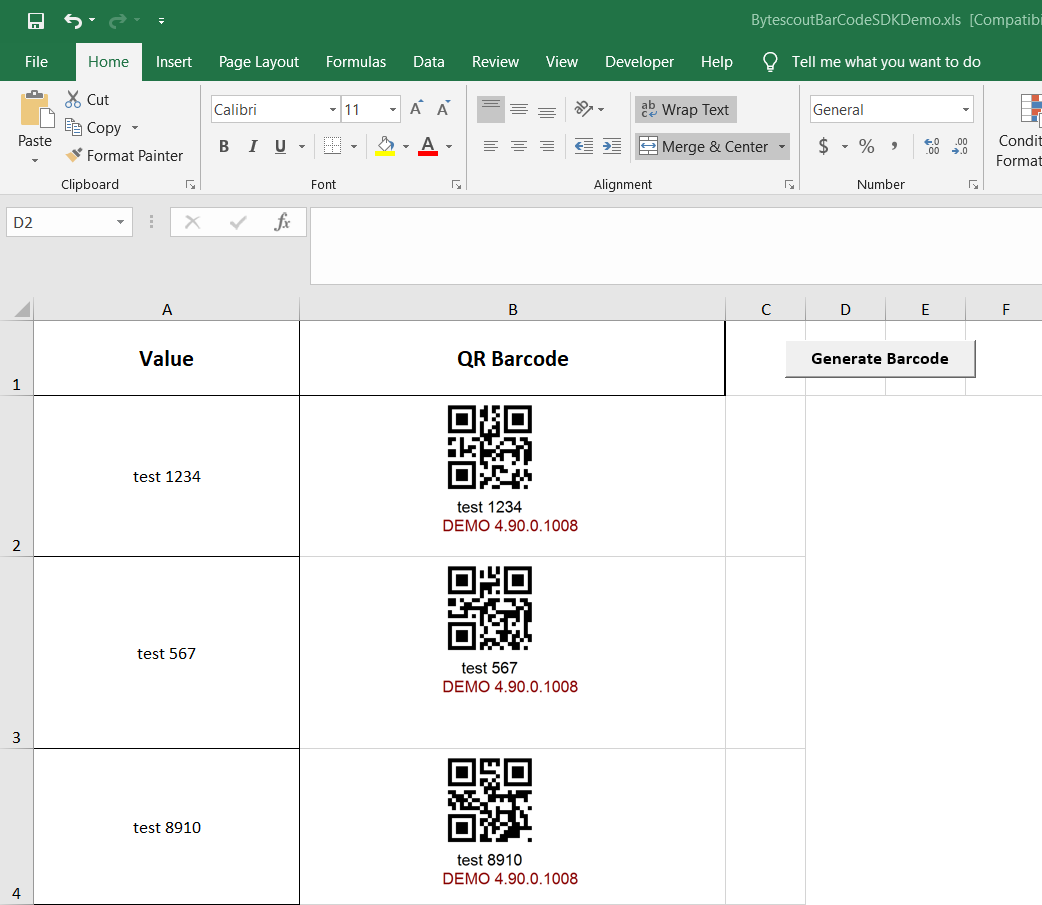
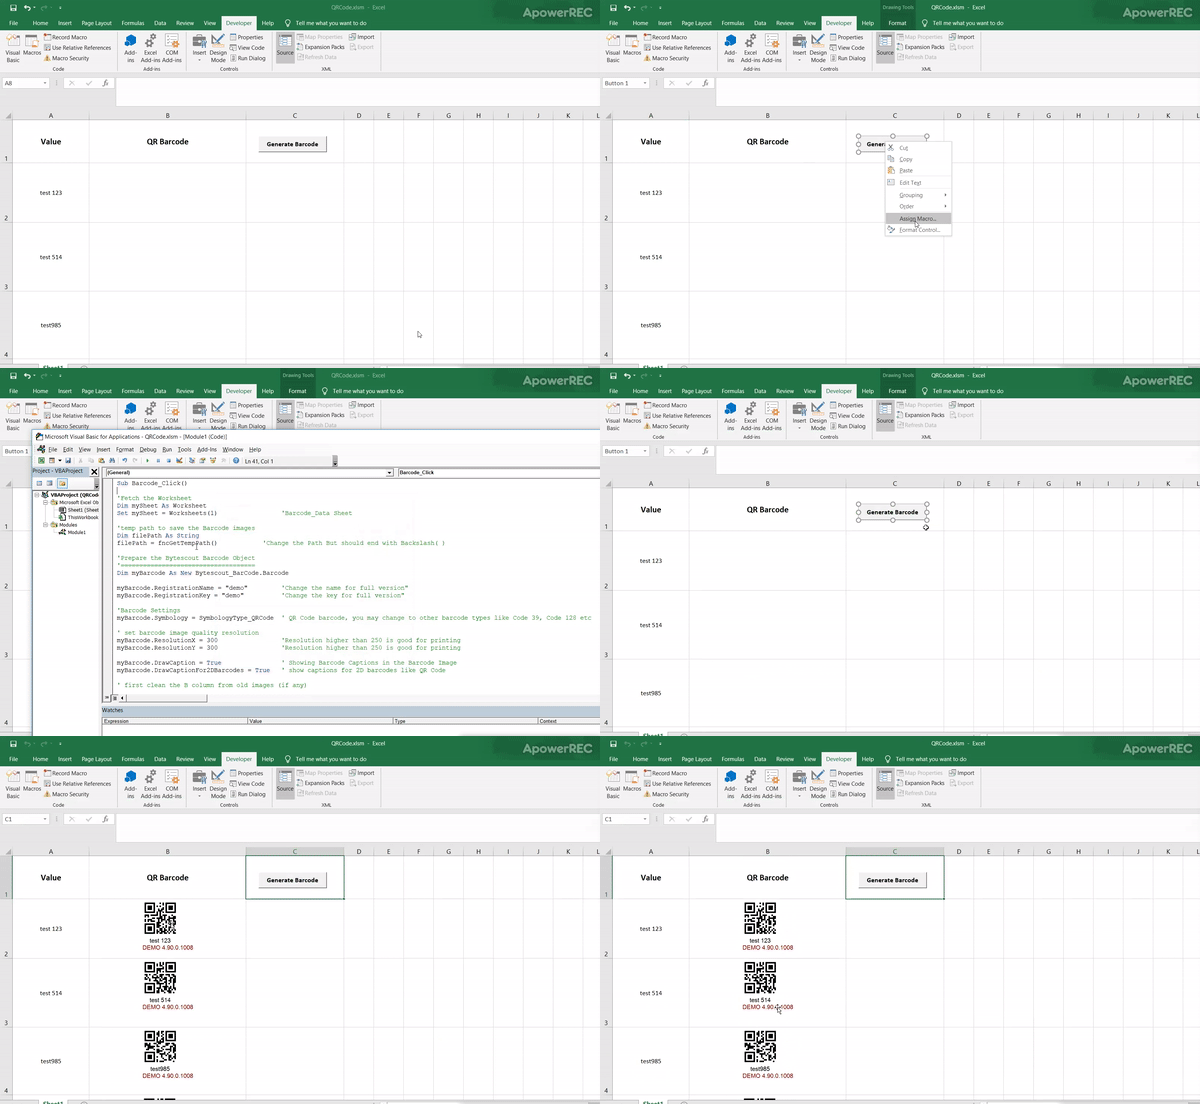
To make the program more interesting we’ll be having two columns. The first column will contain text from which we’ll generate a barcode and place it into the second column. The final output will be as follows.
Before jump into the program, let’s first discuss prerequisites.
The developer tab is the toolbar that has all form controls such as buttons, checkboxes, option buttons/radio buttons, etc. Also, it contains options to view code, add/edit/remove macros.

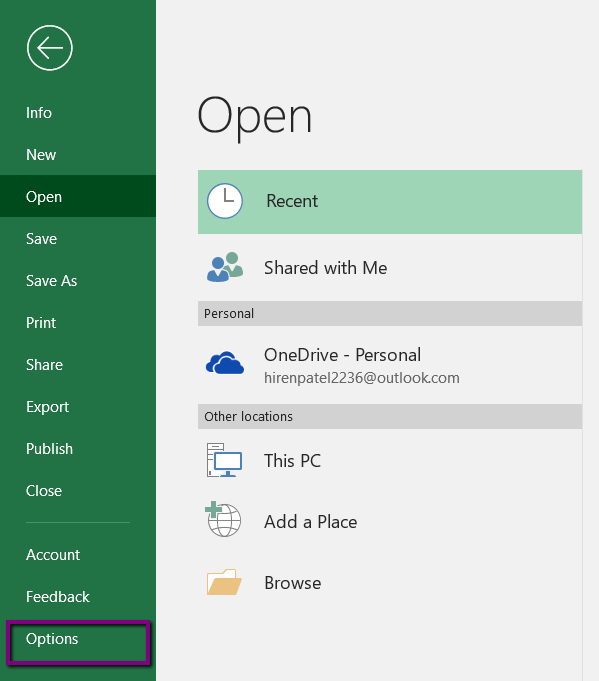
In order to enable the Developer tab goto the File menu then go to the Options tab as shown in the image below.
When the Excel Options window appears, go to the Customize Ribbon option on the left. Click on the Developer check box under the list of Main Tabs on the right. Then click on the OK button.
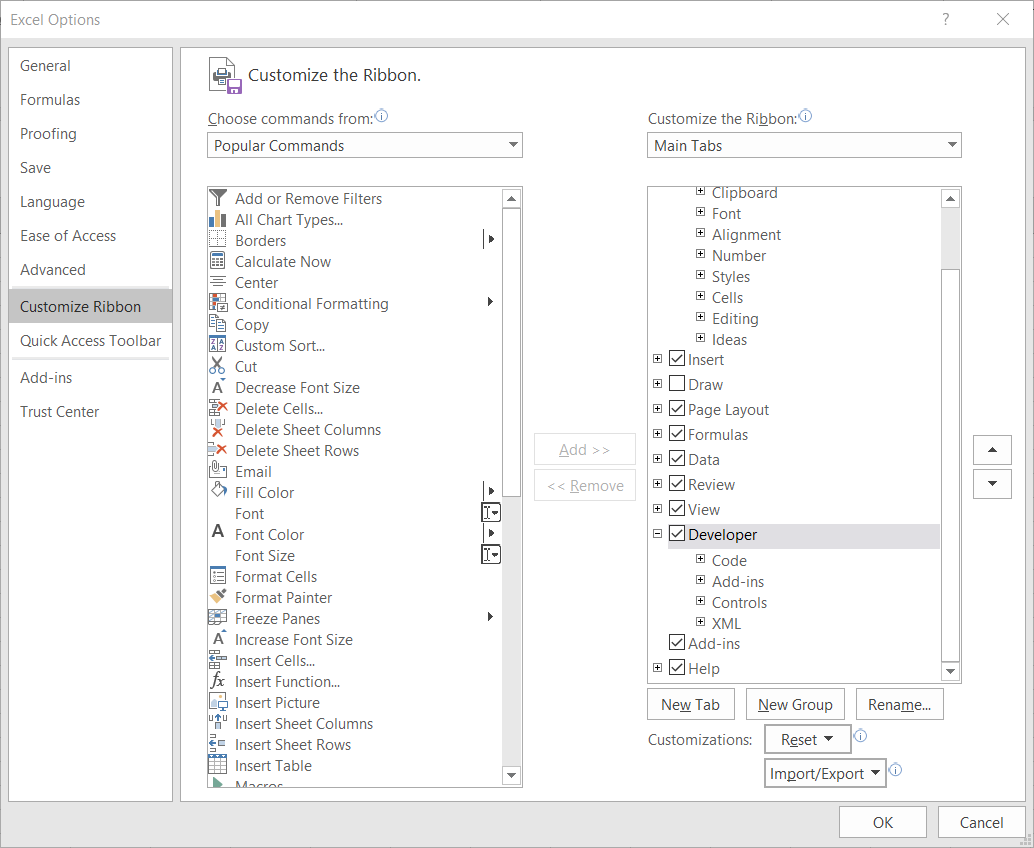
It’ll enable the developer toolbar.
Macros need to be enabled and trusted in order for the code to run further. Go to “Macro Security” in the Developer tab, and select “Enable all macros” under the Macro Settings panel. Also, enable “Trust access to the VBA project object model” which is under Developer Macro Settings.
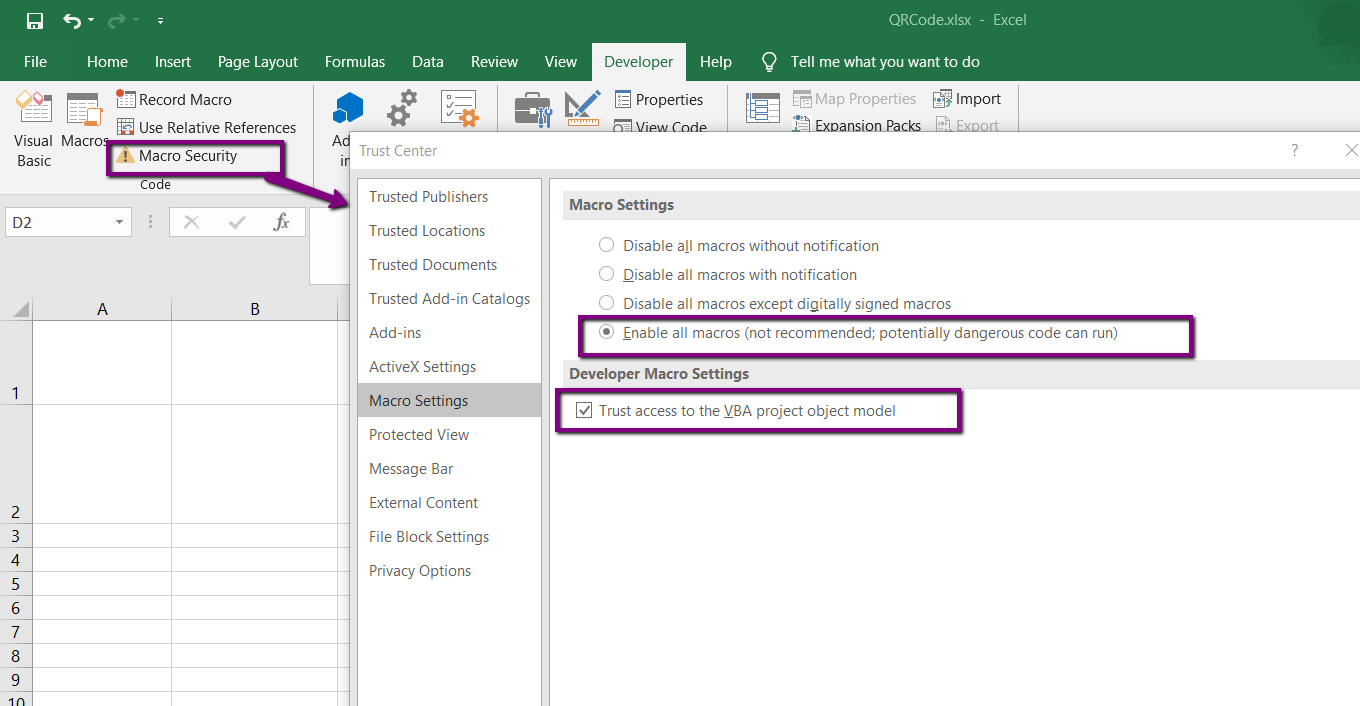
After these changes please close and reopen this Excel document.
In order to add the Bytescout Barcode SDK reference goto Visual Basic button inside the Developer tab. Then go to the Tools menu and click on References as shown in the screenshot below.
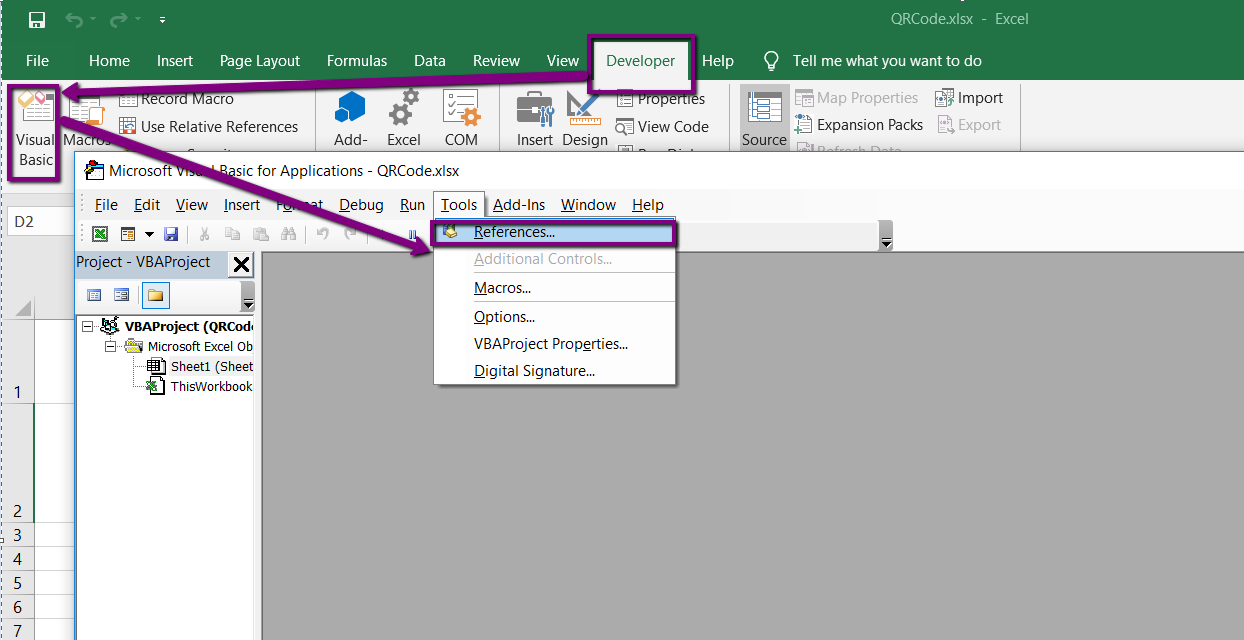
After that’s done, a new window will appear containing all ActiveX libraries. In that select “ByteScout Barcode SDK” and press the OK button.
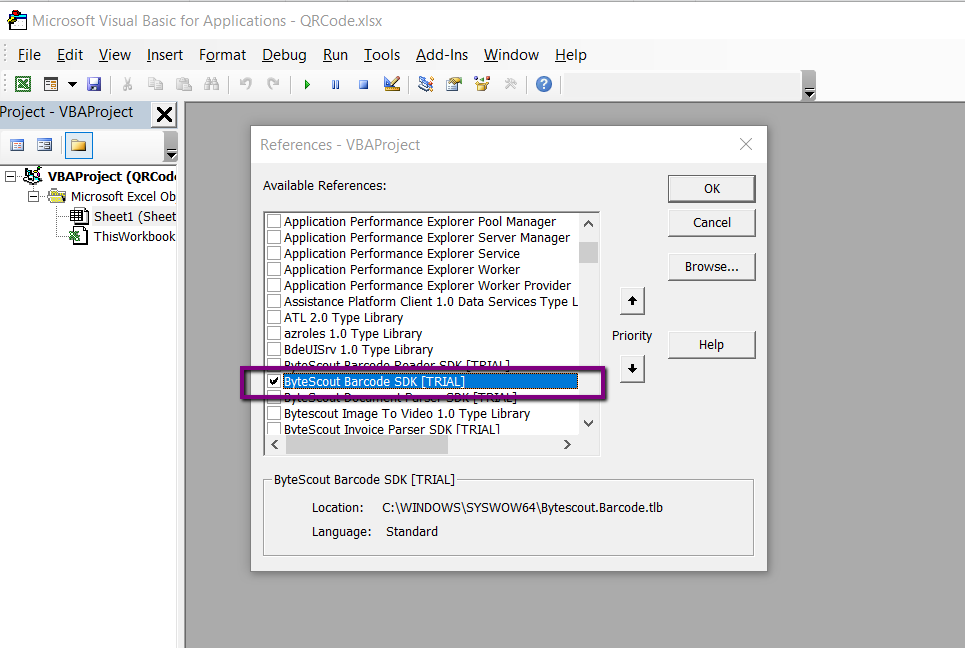
Please note, in order to get this library reference you need to have the ByteScout SDK installed on your machine. You can get ByteScout SDK from this link.
With these done, we’re ready to format excel and add the button to it. We’re also going to add a button inside named “Generate Barcode”.
In order to add a button go to the “Insert” dropdown then select the button icon and draw it inside the worksheet.
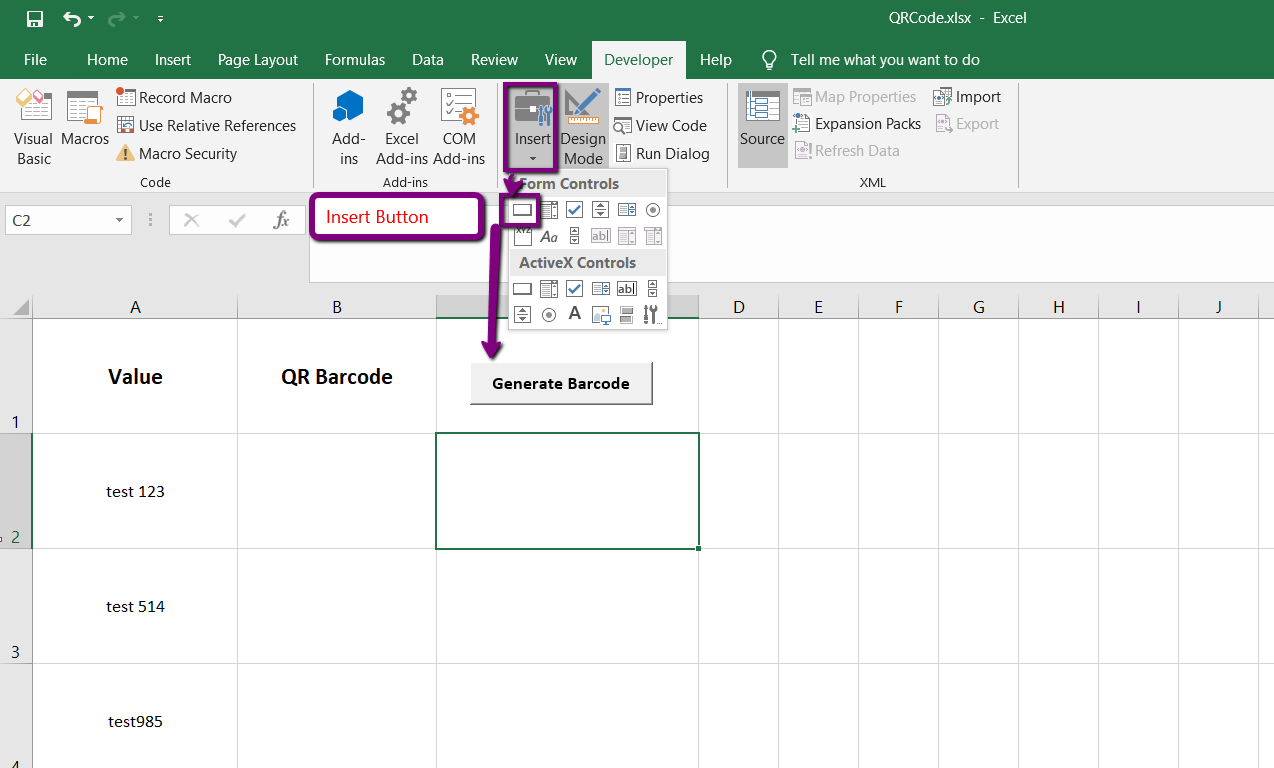
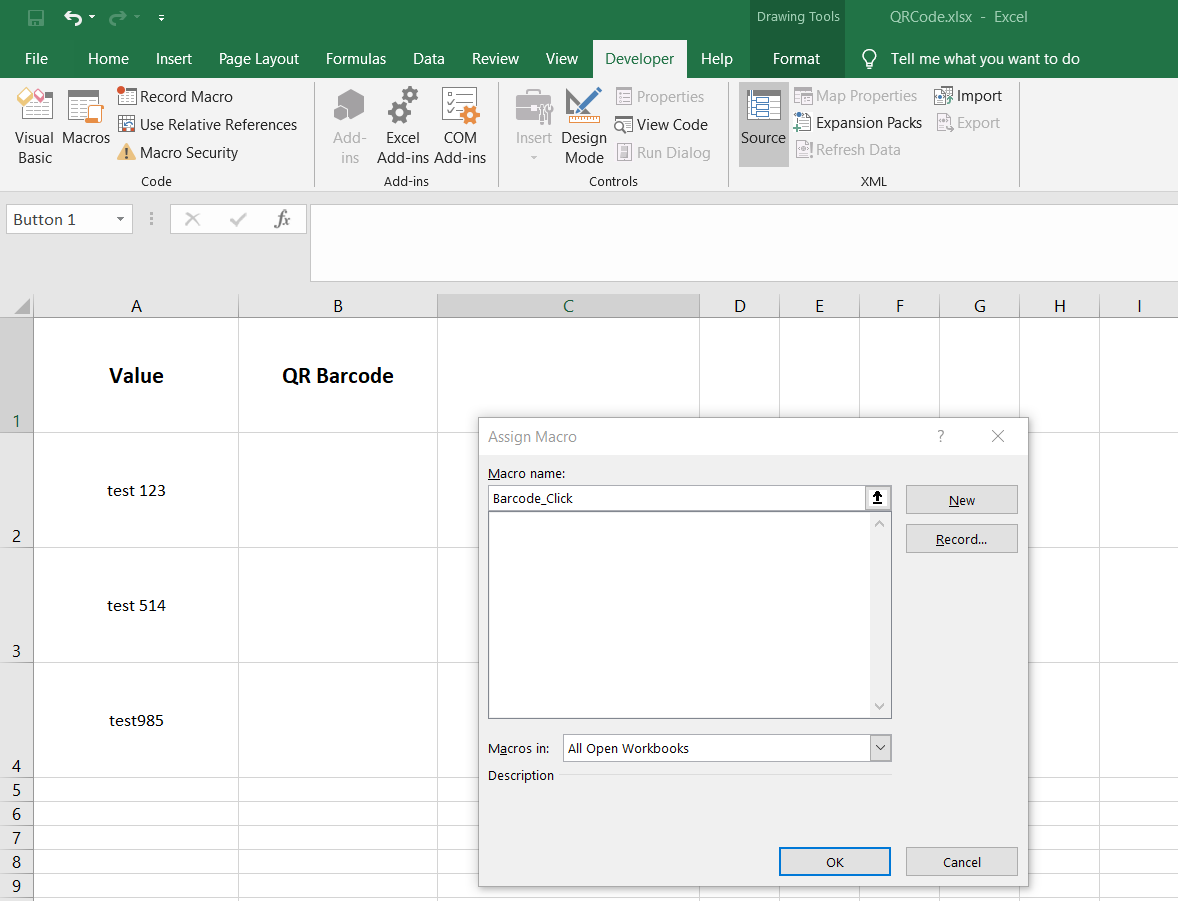
When you add the button to it, it’ll ask for the macro name which we want to associate on the button click. In this case, we’re using the name “Barcode_Click”.
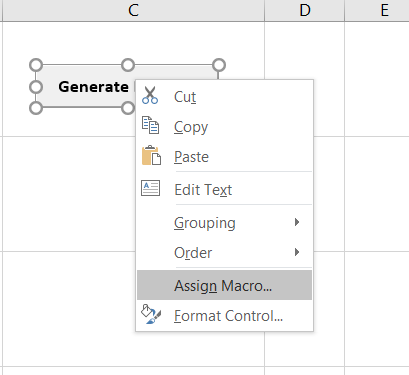
We can also add macro afterward or add code to macro by exploring the “Assign Macro” option which we’ll get by the right-clicking button.
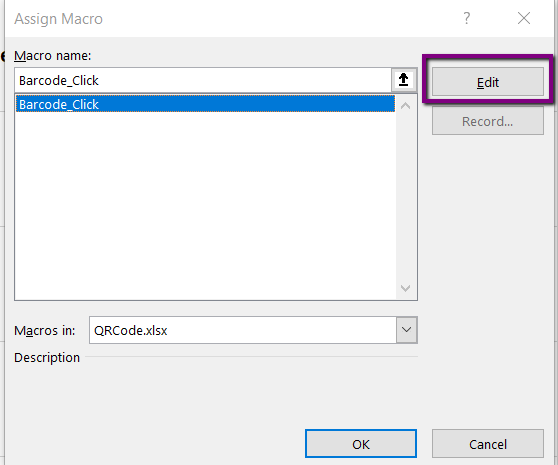
In order to write code, we can just click edit macro, and it’ll show the code editor as shown in the image below.
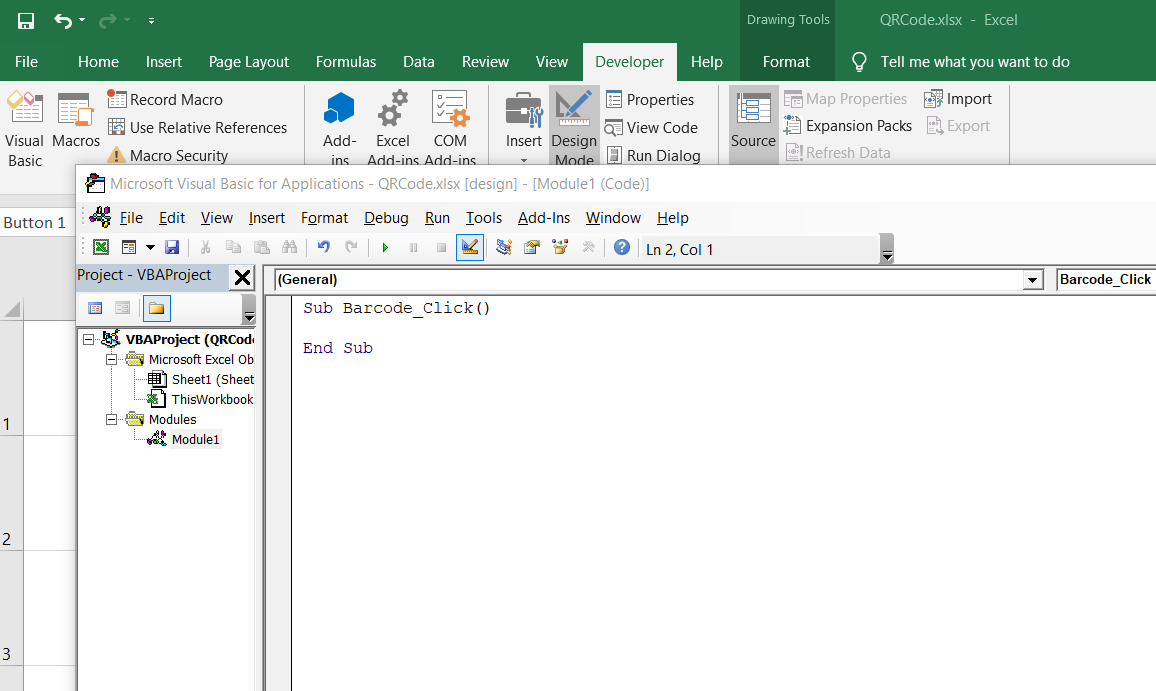
With this all set, it’s time to add code.
First of all, let’s see the full program and output, then we’ll analyze it. The VBA program is as follows.
‘ ==============================================
‘ References used
‘ =================
‘ Bytescout Barcode SDK
‘
‘ IMPORTANT:
‘ ==============================================================
‘1) Add the ActiveX reference in Tools -> References
‘2) Loop through the values from Column A for which barcode has to be generated
‘3) Parse the value to Bytescout Barcode Object to generate the barcode using the QR Code barcode type.
‘4) Save the generated Barcode Image
‘5) Insert the Barcode Image in Column B
‘6) Repeat the steps 3 to 5 till the last Value in Column A
‘
‘==================================================================
Option Explicit
' declare function to get temporary folder (where we could save barcode images temporary)
Declare Function GetTempPath _
Lib "kernel32" Alias "GetTempPathA" _
(ByVal nBufferLength As Long, _
ByVal lpBuffer As String) As Long

' function to return path to temporary folder
Public Function fncGetTempPath() As String
   Dim PathLen As Long
   Dim WinTempDir As String
   Dim BufferLength As Long
   BufferLength = 260
   WinTempDir = Space(BufferLength)
   PathLen = GetTempPath(BufferLength, WinTempDir)
   If Not PathLen = 0 Then
       fncGetTempPath = Left(WinTempDir, PathLen)
   Else
       fncGetTempPath = CurDir()
   End If
End Function

Sub Barcode_Click()

'Fetch the Worksheet
Dim mySheet As Worksheet
Set mySheet = Worksheets(1)                 'Barcode_Data Sheet

'temp path to save the Barcode images
Dim filePath As String
filePath = fncGetTempPath()            'Change the Path But should end with Backslash( )

'Prepare the Bytescout Barcode Object
'====================================
Dim myBarcode As New Bytescout_BarCode.Barcode

myBarcode.RegistrationName = "demo"         'Change the name for full version"
myBarcode.RegistrationKey = "demo"          'Change the key for full version"

'Barcode Settings
myBarcode.Symbology = SymbologyType_QRCode  ' QR Code barcode, you may change to other barcode types like Code 39, Code 128 etc

' set barcode image quality resolution
myBarcode.ResolutionX = 300                 'Resolution higher than 250 is good for printing
myBarcode.ResolutionY = 300                 'Resolution higher than 250 is good for printing

myBarcode.DrawCaption = True                ' Showing Barcode Captions in the Barcode Image
myBarcode.DrawCaptionFor2DBarcodes = True   ' show captions for 2D barcodes like QR Code

' first clean the B column from old images (if any)
Dim Sh As Shape
With mySheet
  For Each Sh In .Shapes
      If Not Application.Intersect(Sh.TopLeftCell, .Range("B1:B50")) Is Nothing Then
        If Sh.Type = msoPicture Then Sh.Delete
      End If
   Next Sh
End With

' now generate new barcodes and insert into cells in the column B
' Repeat the steps for each row from 2 to 6
Dim myVal As Integer

For myVal = 2 To 6                          'change the code to all rows with values
   'Parse the Value from the Column A to Bytescout Barcode Object
   myBarcode.Value = mySheet.Cells(myVal, 1).Text
   'Fit the barcode into 80X30 mm rectangle
   myBarcode.FitInto_3 80, 30, 4           '4 refers to units of measurement as millimeter
   'Save the barcode image to a file in temporary folder
   myBarcode.SaveImage filePath & "myBarcode" & myVal & ".png"

   'Insert the Barcode image to the Column B and resize them to fit the cell.
   '==========================================================================
   With mySheet.Pictures.Insert(filePath & "myBarcode" & myVal & ".png")
       .ShapeRange.LockAspectRatio = True ' lock aspect ratio
       .Left = mySheet.Cells(myVal, 2).Left + 1 ' set left
       .Top = mySheet.Cells(myVal, 2).Top + 1 ' set right
       .PrintObject = True ' allow printing this object
       .Placement = xlMove ' set placement mode to move but do not resize with the cell
       .ShapeRange.ScaleHeight 1, True ' set height scale to 1 (no scale)
       .ShapeRange.ScaleWidth 1, True ' set width scale to 1 (no scale)
   End With


Next myVal ' move to next cell in the column

' Release the Barcode Object.
Set myBarcode = Nothing

End Sub
The input is as follows.
Though the code is self-explanatory, let’s analyze its main parts.
'Fetch the Worksheet
Dim mySheet As Worksheet
Set mySheet = Worksheets(1) 'Barcode_Data Sheet
Here, we’re creating a variable named “myBarcode”, and mark it as an instance of Bytescout barcode class instance. Then add the registration key and name. In this case, we’re using trial keys, but you can replace it with your keys which you’ll get at the time of purchase.
Then we are setting Symbology as QRCode and setting its properties like resolution, drawCaption, etc.
'Prepare the Bytescout Barcode Object
‘====================================
Dim myBarcode As New Bytescout_BarCode.Barcode
myBarcode.RegistrationName = "demo" 'Change the name for full version"
myBarcode.RegistrationKey = "demo" 'Change the key for full version"
'Barcode Settings
myBarcode.Symbology = SymbologyType_QRCode ' QR Code barcode, you may change to other barcode types like Code 39, Code 128 etc
' set barcode image quality resolution
myBarcode.ResolutionX = 300 'Resolution higher than 250 is good for printing
myBarcode.ResolutionY = 300 'Resolution higher than 250 is good for printing
myBarcode.DrawCaption = True ' Showing Barcode Captions in the Barcode Image
myBarcode.DrawCaptionFor2DBarcodes = True ' show captions for 2D barcodes like QR Code
Now we’ll loop-through all cells, read cell values, generating QR code, and saving that image to the temporary path. Then getting that image path and insert it into the cell.
' now generate new barcodes and insert into cells in the column B
' Repeat the steps for each row from 2 to 6
Dim myVal As Integer
For myVal = 2 To 6 'change the code to all rows with values
'Parse the Value from the Column A to Bytescout Barcode Object
myBarcode.Value = mySheet.Cells(myVal, 1).Text
'Fit the barcode into 80X30 mm rectangle
myBarcode.FitInto_3 80, 30, 4 '4 refers to units of measurement as millimeter
'Save the barcode image to a file in temporary folder
myBarcode.SaveImage filePath & "myBarcode" & myVal & ".png"
'Insert the Barcode image to the Column B and resize them to fit the cell.
‘==========================================================================
With mySheet.Pictures.Insert(filePath & "myBarcode" & myVal & ".png")
.ShapeRange.LockAspectRatio = True ' lock aspect ratio
.Left = mySheet.Cells(myVal, 2).Left + 1 ' set left
.Top = mySheet.Cells(myVal, 2).Top + 1 ' set right
.PrintObject = True ' allow printing this object
.Placement = xlMove ' set placement mode to move but do not resize with the cell
.ShapeRange.ScaleHeight 1, True ' set height scale to 1 (no scale)
.ShapeRange.ScaleWidth 1, True ' set width scale to 1 (no scale)
End With
Next myVal ' move to next cell in the column
I hope this article explains all steps in order to code with Bytescout Barcode SDK inside the Excel worksheet. That’s all guys.
Happy Coding!