Our ByteScout SDK products are sunsetting as we focus on expanding new solutions.
Learn More
Important Update
ByteScout SDK Sunsetting Notice
Our ByteScout SDK products are sunsetting as we focus on our new & improved solutions.Thank you for being part of our journey, and we look forward to supporting you in this next chapter!
Read and Write Excel files in C# – Sample Source Codes – Read from Excel File
Read and Write Excel files in C# tutorial shows how to write to and read from Excel file from your application using Speadsheet SDK. Use sample C# source codes for Excel reading and writing. Get the most of this tutorial by learning the source samples. Read the Excel file in C# with the help of the code below.
Write to Excel file from your application
using System;
using System.Collections.Generic;
using System.Text;
using Bytescout.Spreadsheet;
using System.Diagnostics;
using System.IO;

namespace HelloWorld
{
   class Program
   {
       static void Main(string[] args)
       {
           // Create new Spreadsheet
           Spreadsheet document = new Spreadsheet();

           // add new worksheet
           Worksheet Sheet = document.Workbook.Worksheets.Add("FormulaDemo");

           // headers to indicate purpose of the column
           Sheet.Cell("A1").Value = "Formula (as text)";
           // set A column width
           Sheet.Columns[0].Width = 250;

           Sheet.Cell("B1").Value = "Formula (calculated)";
           // set B column width
           Sheet.Columns[1].Width = 250;


           // write formula as text
           Sheet.Cell("A2").Value = "7*3+2";
           // write formula as formula
           Sheet.Cell("B2").Value = "=7*3+2";

           // delete output file if exists already
           if (File.Exists("Output.xls")){
               File.Delete("Output.xls");
           }

           // Save document
           document.SaveAs("Output.xls");

           // Close Spreadsheet
           document.Close();

           // open generated XLS document in default program
           Process.Start("Output.xls");

       }

   }
}
using System;
using System.Collections.Generic;
using System.Text;
using System.Diagnostics;
using Bytescout.Spreadsheet;
using System.IO;

namespace HelloWorld
{
   class Program
   {
       static void Main(string[] args)
       {
           // Create new Spreadsheet
           Spreadsheet document = new Spreadsheet();
document.LoadFromFile("Sample.xls");

           // Get worksheet by name
           Worksheet worksheet = document.Workbook.Worksheets.ByName("Sheet1");

           // Check dates
           for (int i = 0; i < 4; i++)
           {
               // Set current cell
               Cell currentCell = worksheet.Cell(i, 0);

               DateTime date = currentCell.ValueAsDateTime;

               // Write Date
               Console.WriteLine("{0}", date.ToShortDateString());
           }

           // Close document
           document.Close();

           // Write message
           Console.Write("Press any key to continue...");

           // Wait user input
           Console.ReadKey();

       }
   }
}
Microsoft Excel is such a powerful software with a lot of features and is mostly used for data analysis. Many times your customers ask you to read or write into an Excel file. In earlier days we generally used to do that using an interop object, but it is unmanaged and kills your application performance.
ByteScout Spreadsheet SDK is such an efficient library that uses its own custom engine to easily read or write Excel files. Before, manipulating Microsoft Excel files in web or windows applications was really a tedious task. But ByteScout Spreadsheet SDK makes our life much easier. It simplifies the process of reading and writing to excel files and hides the complexities involved without needing to deal with Interop. Even no Excel installation is required when we need to write or read into Excel files using this library.
So, this article will demonstrate how to proceed with ByteScout Spreadsheet SDK in C#.
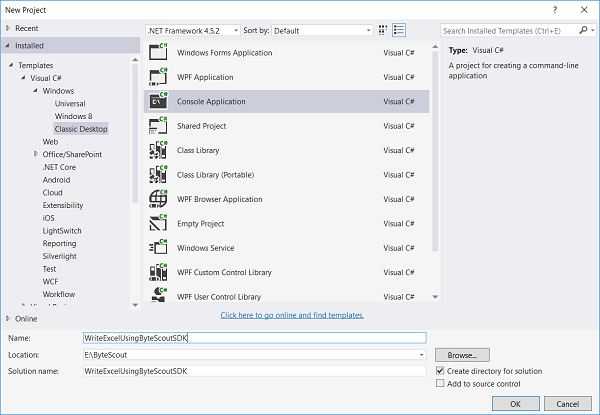
Step 1: Create a new C# console application project.
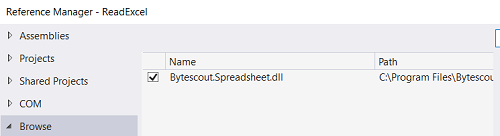
Step 2: Then add Bytescout.Spreadsheet.dll file as a reference to your project.
Step 3: Include the following namespaces in the Program.cs file.
using System;
using Bytescout.Spreadsheet;
Step 4: Add the following code snippet to read data from an Excel file.
                class Program
			    {
				   static void Main(string[] args)
				   {
					   // Create new Spreadsheet
					   Spreadsheet document = new Spreadsheet();
					   document.LoadFromFile("Sample.xls");

					   // Get worksheet by name
					   Worksheet worksheet = document.Workbook.Worksheets.ByName("Sheet1");

					   // Check dates
					   for (int i = 0; i < 4; i++)
					   {
						   // Set current cell
						   Cell currentCell = worksheet.Cell(i, 0);

						   DateTime date = currentCell.ValueAsDateTime;

						   // Write Date
						   Console.WriteLine("{0}", date.ToShortDateString());
					   }

					   // Close document
					   document.Close();

					   // Write message
					   Console.Write("Press any key to continue...");

					   // Wait user input
					   Console.ReadKey();

				   }
			   }
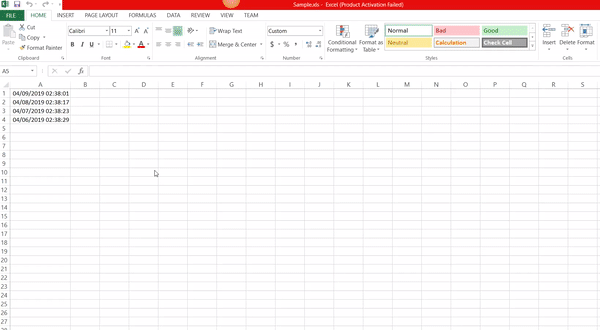
And here’s the output.
I think no need to explain the above code as we simply create an instance of Spreadsheet object and load the physical excel file(resides in bin\Debug folder) into it and read the content of the worksheet by specifying its name. Well, the above sample code is in c#, but you can easily achieve the same thing in VB.Net also.
Step 1: Create a new C# console application project.
Step 2: Then add Bytescout.Spreadsheet.dll file as a reference to your project.
Step 3: Include the following namespaces in the Program.cs file.
using Bytescout.Spreadsheet; using System.Diagnostics; using System.IO;
				class Program
			    {
				   static void Main(string[] args)
				   {
					   // Create new Spreadsheet
					   Spreadsheet document = new Spreadsheet();

					   // add new worksheet
					   Worksheet Sheet = document.Workbook.Worksheets.Add("FormulaDemo");

					   // headers to indicate purpose of the column
					   Sheet.Cell("A1").Value = "Formula (as text)";
					   // set A column width
					   Sheet.Columns[0].Width = 250;

					   Sheet.Cell("B1").Value = "Formula (calculated)";
					   // set B column width
					   Sheet.Columns[1].Width = 250;

					   // write formula as text
					   Sheet.Cell("A2").Value = "7*3+2";
					   // write formula as formula
					   Sheet.Cell("B2").Value = "=7*3+2";

					   // delete output file if exists already
					   if (File.Exists("Output.xls")){
						   File.Delete("Output.xls");
					   }

					   // Save document
					   document.SaveAs("Output.xls");

					   // Close Spreadsheet
					   document.Close();

					   // open generated XLS document in default program
					   Process.Start("Output.xls");
				   }
			   }
The output is as follows.
Let’s understand the above code step by step.
First, we create an instance of Spreadsheet object.
// Create new Spreadsheet
Spreadsheet document = new Spreadsheet();
And then we add the new worksheet in a newly created object of Spreadsheet using the following code.
Workbook – Represents a single workbook within the Spreadsheet object
Worksheet – A member of the Worksheets collection in the Workbook object
And then we set a two-column header name and its width and then write the formula in the respected columns.
               // headers to indicate purpose of the column
			   Sheet.Cell("A1").Value = "Formula (as text)";
			   // set A column width
			   Sheet.Columns[0].Width = 250;

			   Sheet.Cell("B1").Value = "Formula (calculated)";
			   // set B column width
			   Sheet.Columns[1].Width = 250;

			   // write formula as text
			   Sheet.Cell("A2").Value = "7*3+2";
			   // write formula as formula
			   Sheet.Cell("B2").Value = "=7*3+2";
And then we check if the same file name already exists in the application’s bin\Debug folder. If exists then first delete it.
// delete output file if exists already
if (File.Exists("Output.xls")){
File.Delete("Output.xls");
}
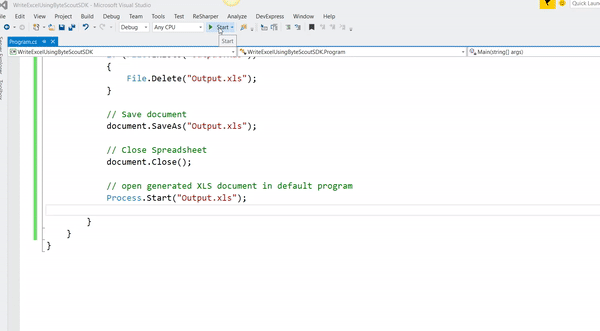
And then we save the newly generated file.
// Save document
document.SaveAs("Output.xls");
In this article, we provided a solution on how to read an Excel file and write it into an Excel file using ByteScout Spreadsheet SDK in C#. For that, we have created two sample console applications and written the code step-by-step. The best way to evaluate the SDK and get to know the code is to debug it and make small changes to see what happens 🙂