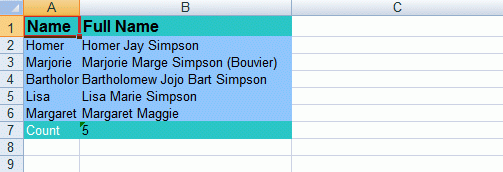
How to use cell formatting (set font color, style, name) for new XLS (Excel) documents generated using Bytescout Spreadsheet lib
This source code demonstrates use of rich formatting for cells in new Excel spreadsheets generated with Bytescout Spreadsheet SDK for .NET
Download example source code: bytescoutxls_using_rich_formatting_to_create_xls_report.zip (5 KB)
using System;
using System.Collections.Generic;
using System.Drawing;
using System.Text;
using Bytescout.Spreadsheet;
using Bytescout.Spreadsheet.Constants;
namespace Using_rich_formatting_to_create_a_XLS_report
{
class Program
{
static void Main(string[] args)
{
// Create new Spreadsheet
Spreadsheet document = new Spreadsheet();
// Add new worksheet
Worksheet worksheet = document.Workbook.Worksheets.Add(“AdvancedReport”);
// Set Values
worksheet.Cell(0, 0).Value = “Name”;
worksheet.Cell(0, 1).Value = “Full Name”;
Color headerColor = Color.FromArgb(75, 172, 198);
Color contentColor = Color.FromArgb(141, 180, 227);
// Set font bold for headers
worksheet.Cell(0, 0).Font = new Font(“Arial”, 12, FontStyle.Bold);
worksheet.Cell(0, 1).Font = new Font(“Arial”, 12, FontStyle.Bold);
// Set back color for headers rows
worksheet.Cell(0, 0).FillPattern = PatternStyle.Solid;
worksheet.Cell(0, 0).FillPatternForeColor = headerColor;
worksheet.Cell(0, 1).FillPattern = PatternStyle.Solid;
worksheet.Cell(0, 1).FillPatternForeColor = headerColor;
worksheet.Cell(6, 0).FillPattern = PatternStyle.Solid;
worksheet.Cell(6, 0).FillPatternForeColor = headerColor;
worksheet.Cell(6, 0).FontColor = Color.White;
worksheet.Cell(6, 1).FillPattern = PatternStyle.Solid;
worksheet.Cell(6, 1).FillPatternForeColor = headerColor;
// Set back color for content rows
for (int i = 1; i < 6; i++)
{
worksheet.Cell(i, 0).FillPattern = PatternStyle.Solid;
worksheet.Cell(i, 0).FillPatternForeColor = contentColor;
worksheet.Cell(i, 1).FillPattern = PatternStyle.Solid;
worksheet.Cell(i, 1).FillPatternForeColor = contentColor;
}
worksheet.Cell(1, 0).Value = “Homer”;
worksheet.Cell(1, 1).Value = “Homer Jay Simpson”;
worksheet.Cell(2, 0).Value = “Marjorie”;
worksheet.Cell(2, 1).Value = “Marjorie Marge Simpson (Bouvier)”;
worksheet.Cell(3, 0).Value = “Bartholomew”;
worksheet.Cell(3, 1).Value = “Bartholomew Jojo Bart Simpson”;
worksheet.Cell(4, 0).Value = “Lisa”;
worksheet.Cell(4, 1).Value = “Lisa Marie Simpson”;
worksheet.Cell(5, 0).Value = “Margaret”;
worksheet.Cell(5, 1).Value = “Margaret Maggie “;
worksheet.Cell(6, 0).Value = “Count”;
worksheet.Cell(6, 1).Value = “5”;
worksheet.Columns[1].Width = 250;
worksheet.Columns[2].Width = 250;
// Save document
document.SaveAs(“AdvancedReport.xls”);
}
}
}
Download example source code: bytescoutxls_using_rich_formatting_to_create_xls_report.zip (5 KB)
