Our ByteScout SDK products are sunsetting as we focus on expanding new solutions.
Learn More
Important Update
ByteScout SDK Sunsetting Notice
Our ByteScout SDK products are sunsetting as we focus on our new & improved solutions.Thank you for being part of our journey, and we look forward to supporting you in this next chapter!
In this tutorial, we will talk about Less and Sass. They both are CSS frameworks that aim to simplify your cascading style sheet by making them more flexible, more compact, and more maintainable. The last section of this tutorial is about Grunt, a background task runner that will help you to organize and automatize your process.
What are they and why do we use them?
The cascading style sheet is a static component. It means that there’s no way to introduce something dynamic like variables or conditional statements. Right now, the only feature making dynamicCSS is media queries but they are for responsive design purposes.
The community envisions bringing a new way of writing CSS files and it comes to reality with the use of CSS pre-processor tools that do exactly Less and Sass. More concretely, Less is build upon javascript and SASS (Syntactically Awesome Stylesheet) is a Ruby-based framework that compiles (most often the community uses the word “transpiler”) a new type of CSS file (.less for less and .sass for Sass) to standard CSS format (which is actually the only format that the web browser can understand). Less or Sass files are slightly different from native CSS files because they both introduce the concept of local and global variables, functions, mixins, nested components, importing external components, and doing inheritance at CSS level. Now that developers have all those new features in hand, they have a flexible way to generate their CSS files and they will stay aware of the DRY pattern (Don’t repeat yourself).
Should we now use Less or Sass in our project?
Neither of the two is mandatory and you can always use the old style. Your website is growing up quickly or you’re facing a major change of the page layout design and you begin to have a problem maintaining a well-structured CSS all the time. Less and Sass prevents all of that.
You should rethink your cascading stylesheet strategy plan to simplify the developer task and to ensure the quality of your stylesheet. Less and Sass are the right tools you need.
How do they work and how to use Sass and Less?
Supposing that you already have all the required components (we’ll see different ways to configure your environment shortly) the first step is to write your .less or .sass files. Then you call your transpiler that will compile your extended CSS file( less or sass depending the case). If errors occur during this compilation step, we’ll get noticed with error messages. This ensures that your final CSS is free of errors. If everything is ok, the transpiler finally generates the definitive CSS file that you’ll send to the client web browser. That means you’ll have neither .less nor .sass contents at the client page, he only sees CSS W3C compliant code.
Prerequisite
In order to use Less or Sass, you need the following skills:
– Have a good knowledge of CSS. Less and Sass extends CSS it is mandatory that you know basic CSS.
– Learn Less syntax or sass syntax depending on the need. This tutorial will cover the most important features for each of them.
Install Sass / Less transpilers with WebCompiler plugin
The advantage of this tool is the simplified installation process, no configuration needed, just install and use it like other visual studio plugins. If you are an asp.net developer using Visual studio, WebCompiler is the best plugin to have in order to use Less, Sass and many other things with the minimum of effort.
Less and Sass integration in Visual Studio
This section shows you the essentials knowledge you need in order to manipulate less or sass file in Visual Studio :
– Create less/sass files
– Generate CSS from less/sass files
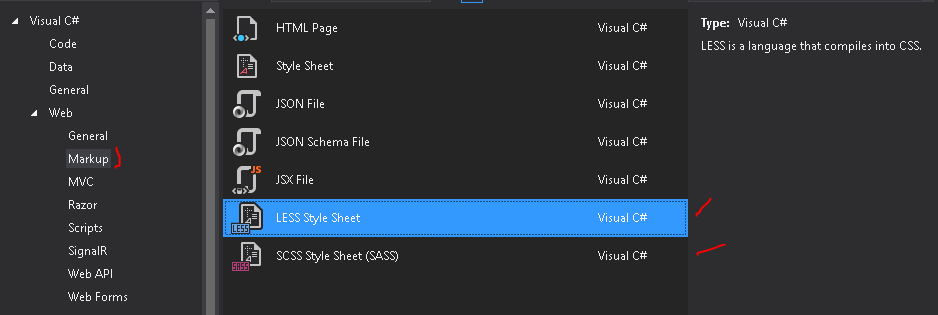
You can create less or sass file as shown below:
Note: SCSS and SASS are almost the same things, the difference is only at the syntax level. SCSS uses curly brackets and semicolons in the same style as a normal CSS file. SASS removes the curly brackets and replace all ending semicolons with a carriage return.
The following codes SASS and SCSS are compiled to the same CSS file
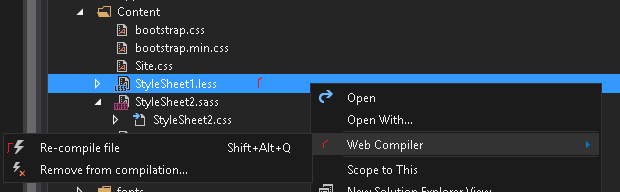
After installing the WebCompiler plugin, a new option named “Web Compiler” is available when right-clicking on .less .sass .scss file. You can manually fire the compile process by selecting the “Compile file” option. Each time you save the file, the Web compiler plugin also triggers a compile process and the final CSS file is available underneath the parent file.
The screenshot below shows how to generate a CSS file from a less file.
Note: You should always link your webpage to the CSS file instead of the *.less or *.sass files.
CSS files are now issued by a compilation process
Any mistake on the .less or .sass file will end up with a compilation error. The compiler displays a warning or an error message and it doesn’t generate the CSS file. This incredible feature ensures that the CSS is always free of malformed expressions.
Note: Intellisense still be available for less or sass files, it simplifies our development task.
LESS / SASS features
In this section, we will enumerate some interesting features. This is not a complete Sass tutorial, we just list all the main options you can do with them. Sass or Less accomplish the same thing only the way differs.
Important notes: when dealing with sass file, beware of indentation otherwise, the compiler raises errors.
Variables
We can declare a variable in Less with @ keyword and $ keyword for Sass and use them along with the code
LESS
SASS
Final CSS
@backgroundcolor: #ff0000;
body{
background-color:@backgroundcolor;
}
$backgroundcolor: #ff0000
body
background-color: $backgroundcolor
body {
background-color: #ff0000;
}
Arithmetical operators
Less and Sass allow dealing with basic arithmetical operators on variables
LESS
SASS
Final CSS
@width: 10px;
body{
min-width:@width + 5px;
}
$width: 10px
body
min-width: $width + 5px
body {
min-width: 15px; }
Functions
We create a function named .set-text-style first and then we call this function with the value “bold”
You can import external data by using @import ( @import is a feature of native CSS). The compiler is able to resolve those dependencies before processing the local file.
where @import-variable is declared inside the file named StyleSheet1.less
Less vs Sass
As stated earlier Less and Sass accomplish almost the same thing, at the end of the day you’ll get the same CSS file. However, there are some points that make a big difference between them and using Sass (or SCSS) is recommended for the following reasons:
– You can actually between two styles of programming in Sass. You can write in Scss style which looks closer than natural CSS. You can also use Sass syntax which is slightly different.
– Mixins are well managed by the use of @mixin and @include keywords. Less declares them as CSS class that may be a source of confusion
– Sass uses @extend for inheritance and property sharing. The equivalent keyword is: extend but it still is more complicated to use and read.
– Sass goes further in arithmetical operator, unit management, and conversion table (it is all about doing arithmetical operation between number having different units – for example, the first one is in pixel and the second one is in em). Less can’t operate on the number having two different units.
– Sass explicitly uses a common conditional statement like @if @else if @else, Less doesn’t.
– Sass offers a smart way to use loop statements with @for keyword. Less hasn’t such an operator but it is always possible to do the same thing using recursive statements.
– Sass has a great all-in-one extension named Compass (http://compass-style.org/) which offers many features to accelerate your development (grid system…). It is highly recommended that you use Compass if you use Sass.
Rather than being a developer tool like Less, Sass, NodeJS, or something else, Grunt is a DevOps tool that manages the automation process in your project. As a process manager, it can automate compilations, bundling, minifying, unit testing… the list is very long but in a few words you can plug any instructions to the Grunt engine and it will manage all the tasks in the order you’ve specified. Grunt is based on Javascript language and it has its own CLI in order to do live queries. It also has its own configuration file where you can store your tasks.
Note: Grunt runs at the server-side even if it is using javascript. Grunt tasks can access the local filesystem.
The rest of this Grunt js tutorial is about using Grunt with Visual Studio 2015 Community.
Installing Grunt to the local project
After creating a new web project (the project type actually doesn’t matter, we can use any type of project), you will add the following two packages.
The first one installs the Grunt cli engine and the second one is useful for integrating grunt task to Msbuild
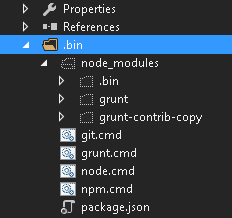
After the installation process, you will see the folder.bin where you can locate the grunt command grunt.cmd
If you try to compile the project at this time, it would fail because the Grunt module is not installed yet.
MSBuild.Grunt.targets(20,9): error: ‘Grunt module not found. Please install Grunt in the node module path
You need to install grunt
Open a command prompt and navigate to the local .bin folder (see above)
Run the commands
npm install grunt –save-dev
At the end of the installation you should have something like
The compilation should be good at this stage.
The next step is to create the project Gruntfile.js – it is the Grunt configuration file
The Gruntfile.js is where you init grunt, declare all grunt tasks, and load grunt plugins. The content initially looks like
module.exports = function (grunt) {
    grunt.initConfig({
    });
};
Here are some examples of tasks that you can do with Grunt
Copying files
We have to install the grunt-contrib-copy plugins
npm install grunt-contrib-copy –save-dev
Note: –save-dev option tells to also install the package on the current project solution
The update .bin folder looks like
To copy all .less files in the Content folder to the backupless folder, the tasks should be configured like
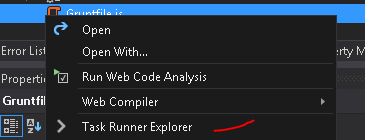
To run the task, you just have to right-click the grunt config file and Task runner explorer
The previous program describes a unique process where source files are taken from the src value and destination folder is the dest value. We can also apply a filter:”isFile” which copy only existing *.less files in the current working directory.
Concatenate all js files to one output file
You need to install the grunt package names grunt-contrib-contact to achieve the file concat.
npm install grunt-contrib-concat –save-dev
The Grunt configuration file is updated as following
The separator options add a semicolon at the end of each file, it is recommended to use it to avoid js error. The task is about aggregating each js file in the Scripts folder to a unique file named bundle.js in the js folder.
Compressing files
We can compress files with the package named grunt-contrib-uglify.
Grunt is a powerful tool that allows you to automate all your process. You’ve seen that it can interact with your project and any underlying parts like the file system. The setup part is the only tricky part, once configured you’ll be free of all repetitive tasks during the deployment stage. At the time writing of writing, there’s an alternative to Grunt: Gulp. The community states Gulp as a more flexible, more powerful, and more simple than Grunt.
About the Author
ByteScout Team of WritersByteScout has a team of professional writers proficient in different technical topics. We select the best writers to cover interesting and trending topics for our readers. We love developers and we hope our articles help you learn about programming and programmers.
Bytescout provides seamless and easy to use SDK for reading barcodes from PDF or image file format. In this article, we'll explore Bytescout Barcode Reader...