Our ByteScout SDK products are sunsetting as we focus on expanding new solutions.
Learn More
Important Update
ByteScout SDK Sunsetting Notice
Our ByteScout SDK products are sunsetting as we focus on our new & improved solutions.Thank you for being part of our journey, and we look forward to supporting you in this next chapter!
CSS module styles – how to write styles for Javascript application
CSS module styles – how to write styles for Javascript application
A web page is essentially composed of three main pieces:
-the content, most often structured by HTML;
-the user interaction handled by javascript;
-the page format managed by CSS stylesheet.
All of those three parts are largely improved since the beginning of the web. In the late years, W3C specifies new standards like Html5 and Css3 while many frameworks are built on Javascript ( Jquery, Angular 2, ReactJS…). Javascript becomes even a server-side language with the use of NodeJs and it’s famous command npm(Node package manager). In parallel to that, CSS knew some major improvements when media queries have been introduced later on. In short media queries allow developers to add a little dynamic behavior to their website by handling the responsiveness of web pages at only CSS level. However, maintaining those CSS classes is very hard over time so the community introduced new ways to write or generate CSS files. Yes, here the correct word is « generate» instead of «write» because the goal of the CSS module is to produce the final CSS file from multiple template files with the help of a JavaScript engine rather than manually writing them as the most of us are used to do. CSS modules introduce the new notion of the locally scoped stylesheet.
Before getting our hands into CSS modules, let’s review some main technics allowing us to deal with CSS files. We also assume that you have the minimum knowledge in CSS.
The classical way
This is the most commonly used technic from the being of the web till now. CSS classes are declared inside the web page between <style></style> markups or declared into a CSS file with the use of <link href=> markup.
CSS inline is still heavily used, they are CSS styles declared as an attribute in an HTML element itself.
Eg <input type=’text’ style=’width:30px;background-color:red ;’/>
One element may be subject to multiple styles heading to an earlier source of concern.
Pre-processor ( Less and Sass )
As stated in the website http://lesscss.org, the goal of a CSS preprocessor is to make more maintainable, and extendable stylesheet. CSS preprocessor extends CSS language by introducing new features like variables, functions … They come with a light compiler (the general name is transpiler) which generates the final CSS content from those CSS derivate languages ( less, sass). In all the cases, the web browser only understands native CSS neither Less nor Sass.
You can find more details about Less at http://lesscss.org/
If you’re going to use Sass, http://sass-lang.com/ is definitely the website to see.
CSS framework
You can also use ready-to-use CSS frameworks like the one in Bootstrap CSS http://getbootstrap.com/. There’s no need to declare your own style you have just to assign those ready-made styles into your element. In the case of Bootstrap, you can use something like
<input type=’submit’ class=’btn’/> where btn is a CSS class exposed by Bootstrap. Prior to using it, you have to make a link to the Bootstrap CSS file location of course.
You can also explore helper frameworks like Tachyons which offers plenty of CSS helper class to better organize your web page design. In short, CSS frameworks are used in a declarative way, you need to affect any of those predefined classes to an element and the job is done. They also take care of CSS collisions.
CSS Modules
The rest of the article focuses on CSS modules. As stated earlier, CSS stylesheet follows parent-child hierarchy over the DOM. A child can then alter the parent style by defining its own style and so on.
This process may involve huge CSS lines of code as your pages grow up, many CSS conflicts arise, and handling global/local scope CSS authority is a tremendous task.
To solve those concerns, the community builds a set of tools to make modular and reusable CSS (so no repetitive declaration either) which takes care of style conflicts between CSS selectors and allowing dependencies features between CSS class.
What is CSS modules?
A CSS style has always a global scope and there’s no way to restrict it to a local scope (of course you can always play with a more accurate and complicated CSS selector to target a specific element where the class should apply, this do the job for few components but becomes a tricky task when you deal with a lot of elements). One of the drawbacks of this general behavior is that a little mistake from one place may corrupt all the main layout style. This is exactly what a CSS module aims to solve.
As quoted on the main website (https://github.com/css-modules/), A CSS Module is a CSS file in which all class names and animation names are scoped locally by default
Why CSS modules?
CSS modules announce the end of global CSS and introduce the notion of locally scoped CSS without any risk of name collision at scale. With this concept in mind, you can now imagine how would be your developer experience if each of your user controls manages its own CSS style with no risk of interfering with others. Are you familiar with ReactJS components? Till now, ReactJS basic component is an independent web control managing itself his state, interaction, and properties. They all are managed at javascript (or jsx in the case of the ReactJS) level. Managing the CSS style had been the missing part of the ReactJS component. With CSS modules you can now create a full isolated, reusable ReactJS component at any level (state, user interactions, data binding, and CSS)
This new concept is very promising. Unfortunately, there’s no detailed resource about implementing a working CSS module at the time of writing. Some exist but require you to be already familiar with tools like NodeJs, Webpack, node modules, and so on… there’s a bunch of tools involved in this process.
In the next section, we will show you how to set up a fresh environment so at the end of the day you will be able to run your first CSS-module example
Writing CSS module step by step
Prerequisite 1: Installing NodeJs
Nowadays NodeJs become an unavoidable tool. It is not mandatory but believe or not the javascript ecosystem is now organized around NodeJs kernel. If you’re not in, it’s high time to read it.
You can install NodeJS whatever your platform is. NodeJS is cross-platform and it is available on Windows, Linux, OSX. You can get the installer at https://nodejs.org/
The installation process is pretty simple, you can check the installed version with the following command.
node -v
v6.9.5
Right after check that the npm(Node Package Manager) command is also available.
npm -h
Npm is the fundamental utility, as a package manager it is able to manage dependencies across NodeJs packages and we really need it in order to install all packages involved in this article.
Create a working directory named first-CSS-module and cd to it
Its name means all web+pack: pack web resources. It is a bundler that merges resources following specific package rules. As a bundler, it receives as input a set of files, applies user rules, and produces a unique big file.
To install the webpack to the system.
npm install webpack -g
Right after check that Webpack is available with the following command
webpack -h
Prerequisite 3: Installing CSS-loader and style-loader
CSS-loader and style-loader are the NodeJs packages we have to install prior to creating our CSS modules.
npm install css-loader style-loader
At this stage, we have all recipes to cook our first CSS-modules.
This is our simple HTML test page where mycontrol-bundle.js is the generated file from Webpack. We will see how to generate it later on. You may also have noticed that the file doesn’t contain any CSS references.
2- Create mycontrol.js
import mydiv from './mycontrol.css'
var output = "
<div class='" + mydiv.normal+"'>The content of my control</div>

";
document.write(output);
Comments :
mycontrol.css looks like a normal CSS (the right name is ICSS – interoperable CSS) file except for the keyword:local(selector). It tells that the associated selector has a local scope so here for the component mycontrol.js only. The immediate effect of that is the generated corresponding class name will be randomly named and the uniqueness of the name means that it is only applicable for the current instance of the associated mycontrol.js, a new name will be generated for another instance of the same control. At mycontrol.js level, we import first the content of the file and make all the content available through the variable. This process follows the sequences:
– reads the CSS file
– transforms CSS class to JS objects
– we can now access CSS class by the unique variable “mydiv” which has now three properties: mydiv.normal, mydiv.disabled, mydiv.error
Packaging the whole components
Right now our browser is not able to understand the content of both files mycontrol.js and mycontrol.css for the following reasons :
– at javascript level, the keyword « import » is not compliant with the web browser javascript engine
– at CSS level. The keyword: local is totally ignored ( still in ICSS format rather than CSS)
We need first to « compile » and then to « bundle » those files with Webpack.
There’s a lot of ways to do that, in this tutorial we choose the one using a configuration file which is the recommended 4-Create webpack.config.js
Webpack needs a file entry point (it acts as the main function for the whole program). In this example, entry.js is the entry point, we will create this file soon.
The output property tells the name of the bundle file, mycontrol-bundle.js in this example. The Module property enumerates the list of required modules we need to run the program. Here we can see the two modules installed earlier, separated with an exclamation mark.
5-Create entry.js
require("./mycontrol.js");
This file is pretty simple since there’s only one component. If you have multiple components, you can list them here and webpack will include them (with all dependencies) in the bundle output file.
6- Compile and Pack
If you’ve followed all the previous steps, the working directory should contain the following files and directories :
– entry.js
– mycontrol.css
– mycontrol.js
– index.html
– webpack.config.js
– node_modules is the directory where npm stored installed modules and their dependencies for the current application.
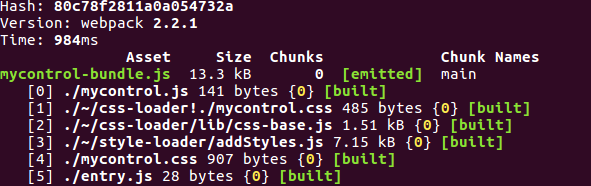
Run the command.
webpack
The file mycontrol-bundle.js is finally created here. As said earlier, the content of mycontrol.js and mycontrol.css are combined inside it with some other additional lines of codes.
If you take a look at the file content, you’ll see a bunch of new codes especially the one doing the javascript export module with module.exports syntax. This is where we expose some parts of our module’s content publicly.
Our component using CSS-module is now finished. To see the result open the file index.html with your web browser, you should have something like this :
Exploring the generated HTML
If you inspect the HTML element, you will see
<div class="_22uyuv-eUyjFh30UR9_9q_">The content of my control</div>
where the class attribute has a random CSS class name. The generated class name is unique by design so there’s no risk that two components share the same class name. You can then consider that this CSS style is only applicable locally by the current instance of the web component. That feature is not only limited to the class name, you can also use the element id selector in the same way.
You can switch to the global property by using: global keyword instead of: local.
Composing class is also possible by the use of the « composes » keyword. For example in the previous example, let’s create another CSS file
mycontrol-text.css
:local(.bigFont) {
font-size:3em;
}
Then we import this style to the .normal class in mycontrol.css like this.
Now that you are aware of what are CSS-modules and how they work, it’s time to talk about their advantages and also see their drawbacks at scale.
Advantages and drawbacks of CSS Modules
Advantages of CSS Modules
They allow us to deal with a local scoped CSS class, components will never collide between them at CSS level.
They ensure that your CSS will never break down from the top to bottom whatever the change you made
Using the CSS module makes your user control a very independent component, preventing unexpected behavior due to external components (at CSS level), this is a very interesting feature if you use ReactJS’ like component. There are even dedicated CSS modules react that you can find at https://github.com/gajus/react-css-modules. It is more flexible in terms of class name mapping and assignment for the ReactJS component.
They improve program design: since CSS class is now randomly named, it avoids developer to query by class selector like $(‘.normal’).on(’,….) which is a bad practice.
Drawbacks of CSS Modules
At the time of writing, there are no complete and detailed resources about it so it is a bit hard to learn it, especially if you are a newbie in the modern JavaScript world. There’s also plenty of tools accomplishing the same goal and this variety sometimes makes your finding very hard ( NodeJs, Webpack, grunt, browserify , ….) Compared to classical CSS, CSS-module requires some additional steps so the developer has to be acquainted with them and he has to stay tuned the latest update since everything is growing up very fast. Instead of writing a classical CSS file, you’ve seen that you have to deal with ICSS a derivate CSS language which demands you to review your learning curve.
CSS-module follows a strict conventional naming. Since CSS content is pairing with the JavaScript object, you have to know the exact name of the CSS class in order to use it in the javascript module file. At the time of writing, there are no smart autocompletion utilities doing automatically this job (VScode, atom, nuclide)
If you are under asp.net MVC 5 or asp.net MVC Core, there are no existing features supporting CSS-module yet.
Conclusion
We’ve seen in this tutorial how CSS modules work and how to do your first step with it. We’ve also discussed the major advantages as well as the drawbacks. CSS modules definitely bring new thinking over CSS usage after nearly two decades of common practice. Before you enter in this world, be aware of stated drawbacks to avoid a run-out budget.
About the Author
ByteScout Team of WritersByteScout has a team of professional writers proficient in different technical topics. We select the best writers to cover interesting and trending topics for our readers. We love developers and we hope our articles help you learn about programming and programmers.
Platform-as-a-service (PaaS) is one of three categories of cloud computing services, alongside software as a service (SaaS) and Infrastructure as a service (IaaS). PaaS allows...