Our ByteScout SDK products are sunsetting as we focus on expanding new solutions.
Learn More
Important Update
ByteScout SDK Sunsetting Notice
Our ByteScout SDK products are sunsetting as we focus on our new & improved solutions.Thank you for being part of our journey, and we look forward to supporting you in this next chapter!
SQL stands for Structured Query Language, and it allows developers and applications to access the data inside a database.
Most websites and applications use a database to store information. Sure, there are some that are a collection of HTML pages that probably don’t have a database, but anything that’s more complicated than that would have a database. The database stores all kinds of data that are used to make the website or application work correctly.
To access the database, the application or website needs to use SQL code. This allows the application or website to read data in the database, update data, create new data, and delete data.
As a developer, you can also access the database directly and run the SQL code. This is most often done as you’re developing the website, or if you’re getting data from the database to perform the analysis.
SQL consists of a set of keywords, just like many other programming languages. There are also syntax requirements.
To use SQL, you:
Write an SQL statement to perform the task you need
Run the statement
If the statement produces an output, view the output
We’ll learn how to do this in this article.
What Is MySQL?
Just like there are many different languages you can develop a website in, there are many different types of databases.
There is a standard SQLdatabase that adheres to the SQL standards. But, there is no database company called “SQL”. There are several companies or vendors who create their own databases, based on the standard SQL language, with several improvements and differences between them.
One of the most popular databases is MySQL, which is a free database used by a lot of websites and applications. It’s popular with many websites because a lot of languages can interact with it easily, there’s a lot of open-source code that goes with it, it’s free, and it’s easy to set up.
We’ll learn how to use MySQL in this article.
There are two other major vendors of SQL databases: Oracle and Microsoft. Oracle has its own database product, and it’s arguably its core feature. Microsoft offers SQL Server, which is a comparable database product. Both of these products are often used by mid-sized or large companies. They are different from MySQL in that they charge license fees for usage, and they offer a lot of performance improvements and features that are beneficial for larger companies.
How to Get Started
Let’s get right into working with SQL.
To get started, we will need to do a few things:
Download and set up a new SQL database
Download and install software to write and run SQL commands
Luckily, because MySQL is so popular, there are a few well-designed and common tools out there for doing this. We’ll be downloading two things.
The first is WAMP. This stands for Windows Apache MySQL PHP. It’s a program that includes all of the back-end stuff that lets you run a MySQL database.
I’m suggesting that we use WAMP because it’s easy to set up. You could download Apache and MySQL separately and install them, as we don’t need PHP, but that takes a bit more work. But, feel free to do that if you prefer.
The second tool is MySQL Workbench. This is the tool that we write our SQL statements in and run them. It’s an IDE for SQL, similar to Visual Studio or Eclipse.
So, how can we get up and running with these tools?
I’ll explain the high-level steps for setting these up and not the details, but I’ll provide a link to the official installation instructions. This is because the process may change in the future, so the link to the instructions will work better.
Installing WAMP
To download and install WAMP, follow these instructions:
Visit wampserver.com
Go to the Downloads page or section, and download the version that matches your operating system. If you’re using a Mac, then you can download a similar tool called MAMP from mamp.info.
Open the downloaded file and follow the steps to install the software. NOTE: If you are asked to create a username and password, or enter a password for an existing user such as “root”, make sure you remember it or write it down temporarily. You’ll need this later.
Once the installation is finished, start WAMP Server by opening it on your computer. An icon in the system tray will appear, which starts as red (nothing running), then changes to orange (some services running), then to green (all services running).
Find the Downloads section and download the version that matches your operating system. There is a Mac version if you’re using a Mac.
Once the download has finished, open the downloaded file and follow the installation steps. If you need to enter a username and password for the database, use those that you entered when installing WAMP.
Once the installation is finished, you can run MySQL Workbench.
When you open MySQL Workbench, you’ll need to set up a connection. Click on the Create Connection button (or the + sign next to MySQL Connections).
Enter a name for your connection. A common name is Local or Localhost, but you can call it whatever you like.
Enter the username you set up earlier (leave it as “root” if you’re not sure) and enter a password, and click OK.
If WAMP is running (which it should be from the earlier steps), you should be able to open this connection and see a new, blank window for your database.
Setting Up Sample Data
We’re almost there! We have our database installed and our tool ready to start writing SQL.
The first thing to learn is how to view data that’s in a database.
But, to do this, the data needs to exist first. Instead of explaining how to create tables and insert data first, I’ll explain how to run these commands that have been prepared already. Then we can start learning how to view data.
Having sample data is a great way to practice your SQL. I use sample data all the time, whether it’s for developing a web app, writing articles for my website DatabaseStar.com, or exploring a concept at work.
So, open up MySQL Workbench and open your connection, if you haven’t done so already. You should see a screen that looks like this:
Now, to set up our data, we need to create a database (or a “schema” in MySQL Workbench), a table to store the data and add the data to the table.
First, we create a database.
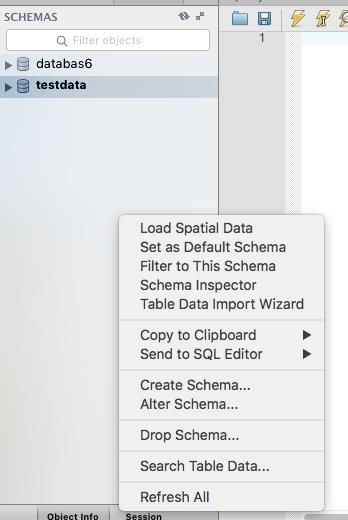
Right-click in the Schemas section on the left of the window and choose Create Schema.
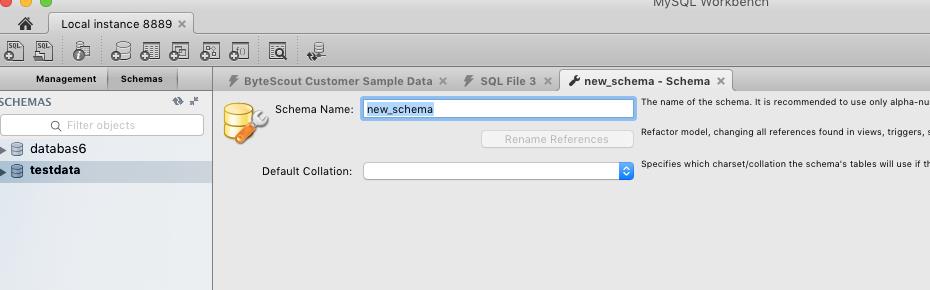
Enter a name for the new schema (I use “testdata”) and click Apply.
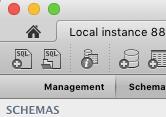
Now, we can add data to the schema. Click on the New SQL Window button, which is the first button on the left on the top menu.
Now you have a new window to write your SQL code in.
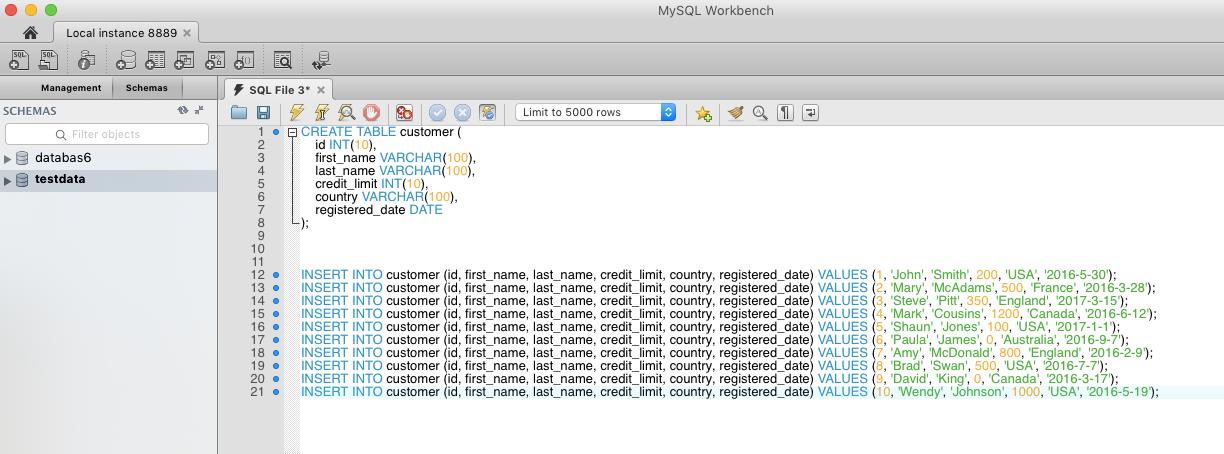
We’ll add our sample data now. To do this, copy this code and paste it into the white area in the middle of MySQL Workbench:
CREATE TABLE customer (
id INT(10),
first_name VARCHAR(100),
last_name VARCHAR(100),
credit_limit INT(10),
country VARCHAR(100),
registered_date DATE
);
To run these commands, click on the Run Script button in the top left of the window, which is the first lightning bolt icon:
Once you do this, the script output will be shown at the bottom of the window. It will show you that the CREATE statement and the INSERT statements have been run.
Now we have our table set up with data, we can start learning about the basic SQL commands.
How to See Data With the SELECT Statement
When you have data in your database, you probably want to see what it is. To see the data that’s in your database, you run a command called SELECT.
SELECT allows you to specify exactly what you want to see. It’s simple to run and see some data, but it also has a lot of functionality to allow some complicated results.
First, let’s look at a simple SELECT statement or SELECT query. To run a SELECT statement, you need to specify two things: the columns you want to select, and the name of the table that has the data.
The syntax for this command is:
SELECT columns
FROM table_name;
There are a few things to notice here. The first word of the statement is SELECT. This indicates it is a SELECT statement and that you want to view the data.
The “columns” are where you add in the names of the columns you want to see. The keyword FROM is how you specify what table you want to look up the data in. Finally, the table_name is where you put the actual name of the table.
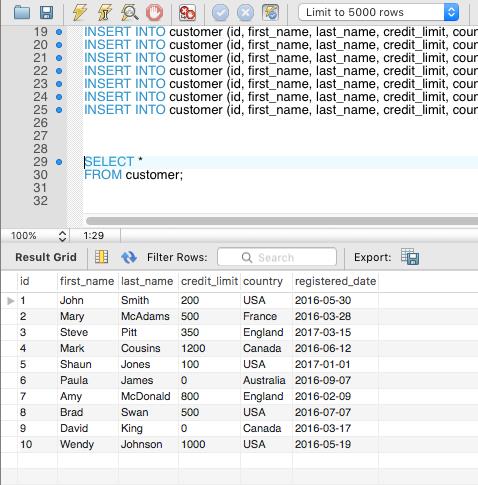
SELECT *
Let’s see an example query. We want to see all of the data in the table. To do this, our query would look like:
SELECT *
FROM customer;
There are a few things to notice on this query.
The * character is used to specify all columns. This means, “show me all columns in the table”. It’s easier to write than specifying each column individually.
Also, the SELECT and FROM are in upper case, but the table name is in lowercase. SQL is not a case-sensitive language. The keywords and table names will work in the upper or lower case. However, to improve the readability of the code, I like to stick to my standard of writing the keywords in upper case, and other object names in lower case.
The statement also ends in a semicolon “;”. This indicates the end of the statement. It’s not required if you have just one statement on the page, but if you have more than one, it’s needed to split up the statements. It’s also a good habit to get into.
So, let’s run this query. Type this query in and press the Run Statement button.
Your screen should look like this:
At the bottom of the page, you should see the output of this query. It will show a table output, which is all of the data in your table:
This shows all of the columns in the table because we specified SELECT *. It also shows all of the rows in the table.
So, that’s how you run a simple SELECT query.
Another way to view the data in a table using the SELECT statement is to actually specify the names of the columns you want to see.
This is useful if you want to only see some of the columns, instead of all columns.
For example, let’s say you wanted to see the first_name and last_name columns but not the id column?
You can do this by specifying the columns instead of the * character, separated by a comma.
The query would look like this:
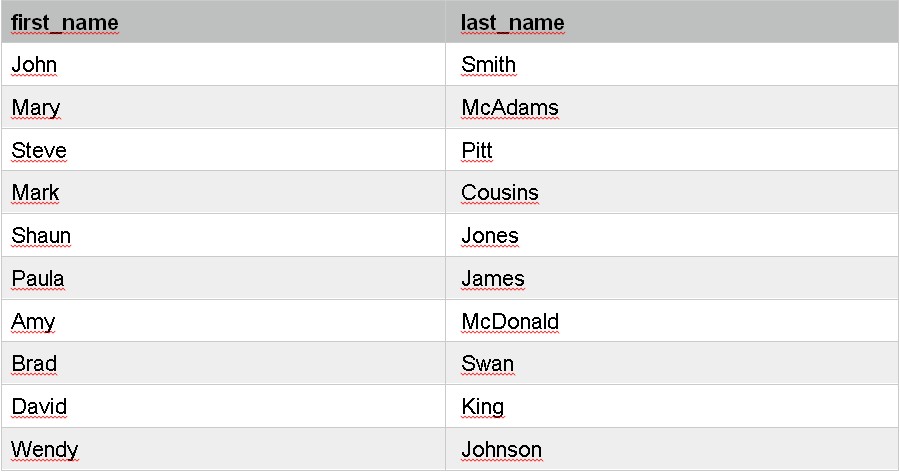
SELECT first_name, last_name
FROM customer;
This means we are selecting these columns, and all of their data, from the table. We don’t want to see data in any of the other columns (like id, registered_date, or country)
If we run the query, we get this output:
The output looks similar to the earlier query, but there are fewer columns shown.
How to Filter Data using the WHERE Clause
The earlier examples showed you how to select all columns and how to select only specific columns.
However, this still showed us all records in the table.
What if we wanted to only see some of the records, that met certain criteria?
For example, only customers that have a credit limit of over 1000?
We can do that by adding another keyword and information to our query. This is called a “clause” – a combination of a keyword and the data that it needs. The FROM clause needs a table, and we’ll look at the WHERE clause now.
The WHERE clause allows you to filter out records that don’t meet the criteria you specify. It only shows records that match.
So, if we want to see only customers that have a credit limit of over 1000, our query would include this line:
WHERE credit_limit > 1000
Any records that meet these criteria are shown.
We need to combine this with our SELECT query to complete the query.
SELECT id, first_name, last_name, credit_limit, registered_date, country
FROM customer
WHERE credit_limit > 1000;
Notice I have added all columns into the SELECT clause (just after the SELECT keyword). This is so it’s clear what columns we’re seeing.
With the WHERE clause at the end of the query, we can now run it. In SQL, the SELECT keyword needs to go first, then the FROM, then the WHERE. If they are in a different order, the query won’t run.
If we run this query, we can see the output:
It only shows customer records that have a credit limit of over 1000. We can see the customer records, and their credit limit, because we specified this information in the SELECT clause.
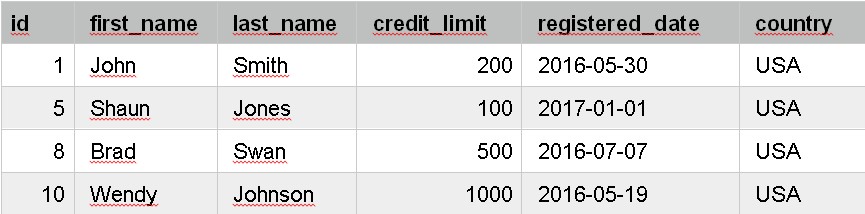
What if we want to see only those customers that are in the USA? We could do this by checking the country column.
Our query could look like this:
SELECT id, first_name, last_name, credit_limit, registered_date, country
FROM customer
WHERE country = ‘USA’
In this query, notice I have changed the WHERE clause to mention the country column. This is the column we want to check the value of.
Also, I have changed the > to an = sign. This is because we’re looking for an exact match for a value. Finally, I have specified the value of ‘USA’, inside single quotes. The single quotes indicate that this is a string or text value, and the USA is the value we’re looking for.
So, if we run this query, we can see this output:
You can see all customer records with a country of the USA. All of the other records are not shown.
This is what the WHERE clause does. It filters out records from the table to only show records that you want to see.
Ordering Your Results
You might have noticed that when you run the SELECT statements so far, that the order the results are displayed in isn’t guaranteed. Or, you might have noticed that they are in the same order as we inserted them.
Databases don’t usually guarantee the order that the query shows the results in. A query that returns results in one order today could return them in a different order tomorrow.
What if you want to see the data in the same order every time? The good news is that you can do that in SQL.
There’s a keyword called ORDER BY, which lets you specify the order of your data when it is displayed. It goes at the end of the SELECT statement.
It looks like this:
ORDER BY column1 [ASC|DESC] , column2…
You specify the column or columns you want to order your results by. You can also specify if you want to order your data in ascending or descending order (it’s ascending if you leave this part out).
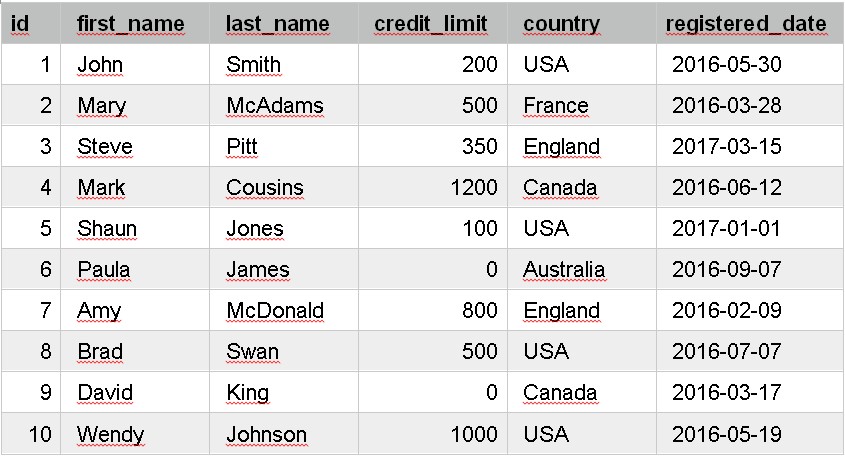
Let’s see an example. Our earlier query showed the customer records. Let’s say we want to order them by the last_name column. Our query would be:
SELECT id, first_name, last_name, credit_limit, registered_date, country
FROM customer
ORDER BY last_name;
We have the ORDER BY at the end of the query, then the last_name column. This orders the data by last_name in ascending order.
The results show:
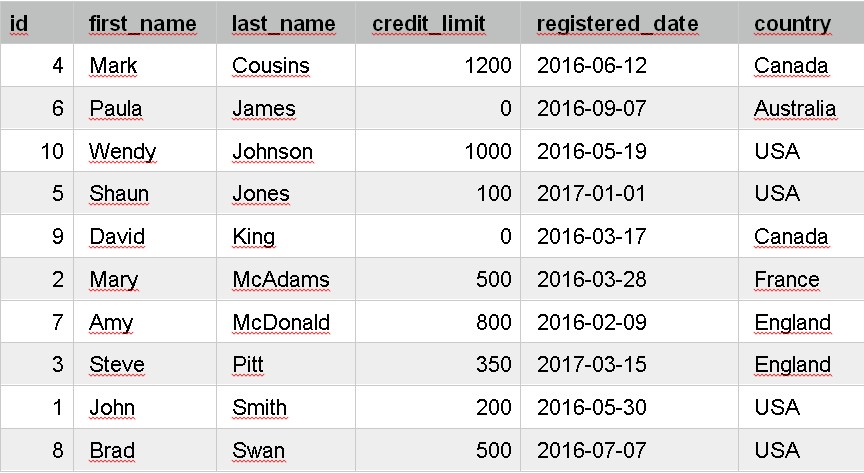
What if we want to order in descending order? We can use the DESC keyword.
SELECT id, first_name, last_name, credit_limit, registered_date, country
FROM customer
ORDER BY last_name DESC;
These results are similar:
The data is the same, but the results are now ordered by last_name in descending order.
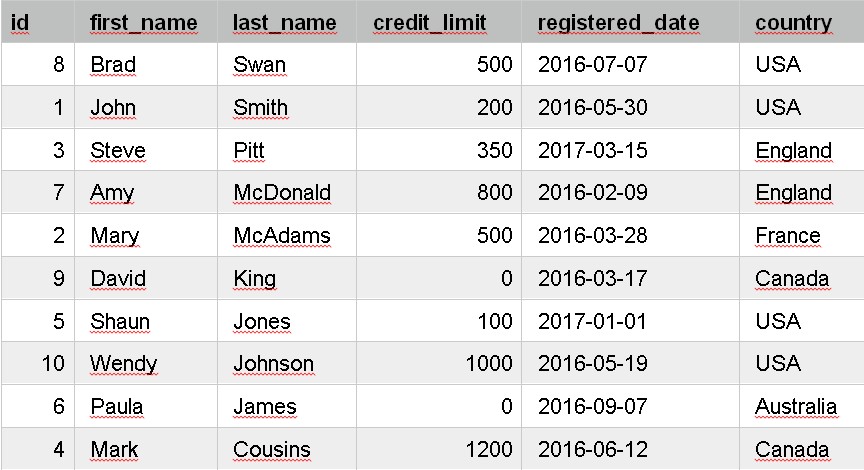
We can order by any column we like, and even combine it with other keywords like the WHERE clause:
SELECT id, first_name, last_name, credit_limit, registered_date, country
FROM customer
WHERE country = ‘USA'
ORDER BY credit_limit;
The results show the ordering:
The ORDER BY clause can be useful if you need your data ordered in a certain way.
Adding New Data with the INSERT Statement
We’ve had a look at some of the different ways we can view data in the database, using the SELECT statement.
But, how do we get data into the database, to begin with? We need to insert it.
At the start of the article, we ran some statements that added the data into the database. These were INSERT statements.
An INSERT statement allows you to add or insert data into a table. Generally, you can insert only one record at a time, but the statement is usually pretty quick and you can run multiple in a row. There are ways to insert multiple records at once, which is something that’s more advanced.
So, how does the INSERT statement work?
The syntax looks like this:
INSERT INTO table_name (col1, col2…)
VALUES (val1, val2);
It starts with the INSERT INTO keywords, which let the database know that you want to insert some data. Then you specify the name of the table you’re inserting the data in to.
Inside the brackets, you specify the columns that you want to put your data in to, and in what order. Sometimes you want to insert data into all columns, and sometimes you don’t. For example, if a column has a default value, then you may want to use that instead of inserting a value for it.
Finally, you have the VALUES keyword, and then inside the brackets are the values you want to insert into the table. They can be numbers, dates, or text values.
The values inside the VALUES brackets need to match the columns inside the table_name brackets – the number of items specified, the data types, and matching to each other. This means the first value specified will be added to the first column specified, the second value to the second column, and so on.
Let’s have another look at our example from earlier, using different data.
This statement will insert some data into the customer table. It inserts into the ID, first_name, last_name, credit_limit, country, and registered_date columns, and it inserts the values mentioned in the VALUES clause.
Changing Existing Data Using the UPDATE Statement
What if you want to make changes to data that is already in the table?
You could delete the table and re-insert all the data again, but that has problems of its own.
Luckily there is a statement in SQL that lets you do this. It’s called the UPDATE statement.
The UPDATE statement lets you update data already in a table, based on conditions you specify.
The statement looks like this:
UPDATE table
SET column1 = value1
WHERE condition;
It’s a smaller statement that the SELECT statement. Let’s see what’s involved.
It starts with the UPDATE keyword, to let the database know you want to update the data. You then specify the name of the table you want to update.
Next is the SET keyword, which lets you specify what is actually being changed. You then specify the name of the column to update, and the value to set it to.
You can specify multiple columns here if you want to change more than one column at once. To do this, add a comma after the value, then specify another pair of “column=value”. We’ll see an example of this shortly.
Finally, you specify a WHERE clause. This lets you specify the rows you want to update. If you don’t have a WHERE clause, the statement will still run, but it will update all records in the table – which you may not want.
So, let’s see an example.
UPDATE customer
SET credit_limit = 1500
WHERE id = 4;
This statement will update the customer table. It sets the credit_limit value to 1500 for all records where the id is 4.
Because it’s an ID column, there is most likely only one record that matches. The data will still get updated.
We can check this by running a SELECT query:
SELECT *
FROM customer
WHERE id = 4;
(output)
You can see that the credit_limit value is now 1500.
Now, what if we want to update more than one column? We can do this in an UPDATE statement.
Let’s say one of our customers moves the country and changes its name, and we want to update our table. This customer’s record looks like this:
SELECT *
FROM customer
WHERE id = 2;
Our statement to update the data could be:
UPDATE customer
SET last_name = ‘Johnson’,
country = ‘Portugal’
WHERE customer_id = 2;
If we run this statement, it will tell us the data was updated. We can run a SELECT statement to check.
SELECT *
FROM customer
WHERE customer_id = 2;
Removing Data Using the DELETE Statement
The last statement we’ll look at is the DELETE statement.
We’ve looked at the viewing, adding, and updating data in our database. But what if we want to delete data? We can do that using the DELETE statement.
The DELETE statement looks like this:
DELETE FROM table_name
WHERE condition;
It’s a much simpler statement than the others we’ve looked at.
It starts with the DELETE FROM keywords, and then you specify the name of the table that contains the data you want to delete.
Next, you specify the WHERE keyword, then the condition that allows you to specify the rows to be deleted. If you don’t add the WHERE clause, then all rows will be deleted.
The DELETE statement deletes entire rows, not individual columns, which is why you don’t need to specify columns in this statement. You just specify the table name and the criteria that match the rows you want to delete.
Let’s say we want to delete all records in the customer table that have a credit_limit of 0.
Our statement would look like this:
DELETE FROM customer
WHERE credit_limit = 0;
If we run our statement, the output looks like this:
Now we can select from the table to see what remains.
SELECT *
FROM customer;
We can see that there are no records with a credit_limit of 0 in the table because we have deleted them. These are records with an ID of 6 and 9.
What Next?
Where to next? What should you focus on if you want to improve your knowledge of SQL?
Practice with these commands on this data until you feel comfortable with the commands.
Create tables with the CREATE TABLE command.
Learn about SQL functions and expressions
Aggregate functions and grouping with the GROUP BY clause
The HAVING clause
Joins between two tables
Conclusion
That brings us to the end of the introduction to SQL.
We’ve learned what SQL is, what MySQL is, how to set up a database, and the software needed to run queries on it.
We learned about the SELECT statement to view data, as well as some of the keywords that are used in SELECT statements such as WHERE and ORDER BY.
We looked at the UPDATE statement to change data that exists, the INSERT statement to add new data to a table, and the DELETE statement to remove data from a table.
Those are the basic commands in SQL, and knowing them is a great foundation to have in the SQL language.
I hope you’ve enjoyed this article and wish you luck with learning more about SQL.
About the Author
Ben Brumm is a software consultant with over 10 years of experience in the IT industry. He is the founder of Database Star, a website that teaches database developers how to improve their skills and career. Read his recent article on SQL indexes here.
The WAITFOR statement is used to stop the execution of the current transaction/Stored procedure until delay time or specified time. How to Use WAITFOR? It...
WooCommerce is the best WordPress plugin (and the most popular) for e-commerce. WooCommerce is a very powerful plugin and has wide functionality and a large...


 Ben Brumm is a software consultant with over 10 years of experience in the IT industry. He is the founder of