Our ByteScout SDK products are sunsetting as we focus on expanding new solutions.
Learn More
Important Update
ByteScout SDK Sunsetting Notice
Our ByteScout SDK products are sunsetting as we focus on our new & improved solutions.Thank you for being part of our journey, and we look forward to supporting you in this next chapter!
Chatbots are the “next” big thing. They enable companies to provide customer support and another plethora of things.
It is a big industry, and according to reports, the Chatbot market will reach 10.08$ billion by 2026.
Artificial Intelligence has made not only the lives of the companies easier but that of the users as well. Customers are more demanding than ever. The fact that customers need answers instantly can give you an idea of customer’s demand.
In this article, we will focus our energies on creating our own first chatbot in Python. So, if you are looking for building chatbots in Python, you have come to the right place.
Chatbots are made possible with the help of machine learning and natural language processing.
What is Chatbot?
A chatbot is defined as a software that servers the conversation purpose with users using either speech or text. A chatbot is also known as artificial agent, bot, chatterbot, and is mainly powered by artificial intelligence and natural language processing.
Some of the most common chatbot examples include Alexa and Siri. When it comes to chatbots using text, Amazon’s customer support is a great example. You can also find unique chatbots across industries, including companion chatbots, fictional chatbots, and so on!
Another unique chatbot use-cases include hotel booking, flight booking, and so on.
Chatbots are also known as “conversational engines” where there is a need to find critical problems that make it useful for the users. These problems are as follows:
Find and understand the communication’s natural language
Finding out who is the target audience and understanding them
Finding out the user’s desire or intent
Finally responding based on the user’s input
In today’s world, we have libraries that specialize in understanding human language. Python’s NLTK library provides the necessary means to connect with machines and make them understand the intent of humans and reply accordingly.
We have covered the NLTK library later on where we discuss how it is useful for creating chatbots. Before that, let’s take a look at chatbot evolution.
Chatbot evolution
Chatbots are not new. Joseph Weizenbaum created the first chatbot in 1966. He came up with a conversational program that lets the user interact and participate in a conversation with the computer program. However, from there, chatbots have evolved immensely with the help of groundbreaking technologies, including artificial intelligence, natural language processing, and machine learning.
Current generation chatbot has the following features:
That’s a step up compared to old bots that were limited in their automation and approach.
The future bots, however, will be more advanced and will come with features like multiple-level communication, service-level automation, and manage tasks.
However, chatbots are not a universal solution. They also have limits. For instance, they can never be truly complete AI. The reason is their incapability to understand human conversations completely. This also means that they lack personality.
How Chatbots Work
Before we get started with our Python chatbot, we need to understand how chatbots work in the first place.
A chatbot can be designed in many ways, but we can categorize them into two broad categories.
Rule-based approach chatbots → In this type, bots are trained according to rules. They are best for executing simple queries. These types of chatbots are useful for applications where there are already predefined options. If the options are less, then a rule-based approach can help the audience.
However, in most cases, they are slow and do not directly answer the user’s query. The most common type of chatbot you will find is when you try to capture leads. It asks user’s questions and then suggests them if they want to register for a newsletter or a subscription.
Self-learning approach chatbots → These chatbots are more advanced and use machine learning. They are efficient in what they do. The self-learning approach of chatbots can be divided into two types.
Generative models → Offer intelligent answers rather than searching for a response from an answer set.
Retrieval-Based models → In this model, the chatbot is designed to pick up a response from a response list.
The self-learning chatbots utilize Machine Learning(ML) to understand the user’s input and then reply based on the ML model. These self-learning approach chatbots require minimal to no human interface for understanding data or recognizing patterns.
These types of chatbots are very useful as they can be used in a plethora of use-cases. So, suppose you have a hosting company and have an intelligent chatbot. In that case, it can guide the user in a better way by providing quick and right answers.
Why Python?
Python is one of the easiest programming languages to work with. Another benefit is the library it has to offer. By building a Python chatbot, you will find it easy to grasp the concepts and the process that is required to create a chatbot in Python from scratch.
In our path to create a simple chatbot code in Python, we will be using ChatterBot. It is a Python library that offers the ability to create a response based on the user’s input.
Another benefit of using ChatterBot is its language-independence feature. That means you can use multiple languages and train the bot using them. The machine learning algorithm used by Chatterbot improves with every single user’s input.
How does ChatterBot work?
ChatterBot lets the developers create conversation bots. It takes a user’s input and saves them and their response. This way, a chatbot with no knowledge can evolve into a much-advanced bot with multiple responses of its own. The more response it gets, the better it becomes. With more input, accuracy is improved. For instance, if a user inputs a statement close enough to another stored statement, it will provide that response to it.
Building Chatbots in Python
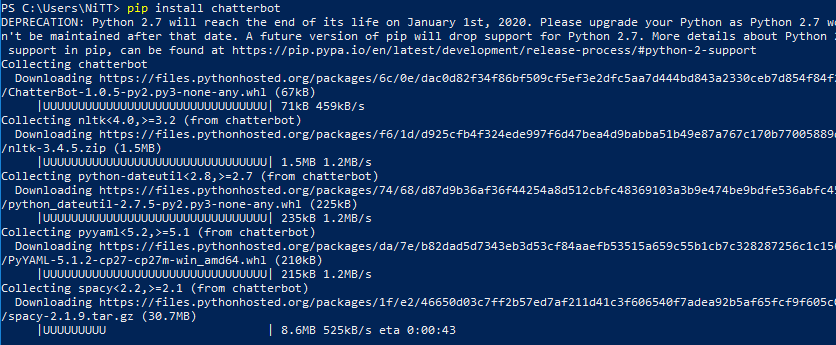
The first step to building a chatbot in Python is to install ChatterBot. If you are using a terminal, you can install ChatterBot with one simple command.
pip install chatterbot
If you are using Windows 10, you can use Windows PowerShell to install the ChatterBot.
Chatbot Trainer
Creating a trainer using a chatbot is easy. All you need to do is use a data utility module. It will help you train your chatbot.
To get started, you can use the data files hosted on GitHub. The module contains training data for multiple languages, and hence, is very flexible.
from chatterbot import chatbot
from chatterbot.trainers import ListTrainer
#new chatbot creation newchatbot= Chatbot(“ByteScout”) trainer = ListTrainer(newchatbot) trainer.train([‘hi, I can help you to find an SDK’,’Thank you for trusting me, let me find an SDK that meets your requirement’, ‘Your SDK is now ready to download’])
#get response from the user response = chatbot.get_response(“I want an SDK”) print(response)
This is a simple trainer who gives output to the user’s input.
The above code is self-explanatory. We create a chatbot named “ByteScout.” Once done, we train the trainer with some outputs. Once done, we respond and then print it.
The above is a Python chatbot code example.
Flask ChatterBot
To make an advanced chatbot using Python, we are going to use Flask ChatterBot. It is a ChatterBot web implementation using Flask – web Python framework.
You need to set up a Flask project before you can proceed. As setting up Flask is beyond the project limitation, you can check out a simple tutorial on how to do it here.
Once done, now, we need to add code to our app.py, index.html, and style.css files.
from flask import Flask, render_template, request
from chatterbot import ChatBot
from chatterbot.trainers import ChatterBotCorpusTrainer
We create a learner_bot, that uses the English corpus. Now, we need to write code for the index.html and style.css file. This will give the bot an interface to interact with the users.
You will get the template of the app on the index.html. We have customized it accordingly to meet our requirements. The code for the index.html file is as below.
<!DOCTYPE html> <html> <head> #import jquery #import style.css </head> <body> <h1> Python chatbot tutorial</h1> <div> <div id=”learnerbot”> <p class=”learnerbotText”><span>Hi! I’m a simple chatbot in Python.</span></p> </div> <div id=”userInput”> <input id=”textInput” type=”text” name=”messg” placeholder=”Message”> <input id=”buttonInput” type=”submit” value=”Send”> </div> <script> function getBotResponse() { var rawText = $(“#textInput”).val(); var userHtml = ‘<p class=”userText”><span>’ + rawText + ‘</span></p>’; $(“#textInput”).val(“”); $(“#learnerbot”).append(userHtml); document.getElementById(‘userInput’).scrollIntoView({block: ‘start’, behavior: ‘smooth’}); $.get(“/get”, { msg: rawText }).done(function(data) { var botHtml = ‘<p class=”learnerbotText”><span>’ + data + ‘</span></p>’; $(“#learnerbot”).append(botHtml); document.getElementById(‘userInput’).scrollIntoView({block: ‘start’, behavior: ‘smooth’}); }); } $(“#textInput”).keypress(function(e) { if(e.which == 13) { getBotResponse(); } }); $(“#buttonInput”).click(function() { getBotResponse(); }) </script> </div> </body> </html>
For CSS, you can customize it according to your needs.
Building Chatbot using NLTK
In this section, we will look into any way of creating a chatbot. Python has an impressive library, and you can also find multiple frameworks for creating chatbots. One such framework is NLTK. It is a leading platform that offers developers to create python programs using human language data.
NLTK extensively utilizes Natural Language Processing(NLP). If we look deeper, we will find that NLP consists of two major concepts:
Natural Language Understanding(NLU): This aspect of NLP covers the machine’s understanding of natural languages such as English, Japanese, Korean, etc.
Natural Language Generation(NLG): NLG, on the other hand, deals with the machine’s ability to generate text that humans can comprehend and are also close to human handwritten sentences.
So, for example, if the user asks the chatbot about the weather, he will ask it mostly in the following way: “Hey chatbot, can you tell me what’s the weather like today?”
To understand the above sentence, the chatbot will try to figure out two basic things from the user’s given input. He will try to find out the entity and the intent. Here, the intent is to figure out today’s weather. On the other hand, the entity is the details about the specific intent, which in this case, is “today.”
Once the chatbot understands this, he will then use the machine learning model to find the values of the two things and then provide the output.
Prerequisites
To get started with NLTK, you have to Keras as well. To ensure that all the prerequisites are installed, run the following command in the terminal.
pip install TensorFlow Keras pickle nltk
NLTK comes with a module known as “nltk.chat.” It simplifies chatbot creation. All you need to do is utilize the framework and the dataset and build a chatbot using it. Right now, there are plenty of online tutorials you can follow. We recommend checking them out.
This leads us to the end of the chatbot project in Python. The Python conversation bot is very minimal in its features, but the tutorial will surely give you an idea of what chatbots are all about and how to make one for yourself.
From here, you can check the more advanced tutorial on the web, and start creating your AI chatbot Python.
So, what do you think of the tutorial? Which type of chatbot are you going to create? Comment below and let us know.
About the Author
ByteScout Team of WritersByteScout has a team of professional writers proficient in different technical topics. We select the best writers to cover interesting and trending topics for our readers. We love developers and we hope our articles help you learn about programming and programmers.
With the rise of new technologies, the scope of software development is developing remarkably. The use of advanced frontend and backend technologies is necessary for...
Apple still does not allow other software developers to implement and publish custom watch faces for Apple Watch (though you can purchase Apple Watch Hermès...