Our ByteScout SDK products are sunsetting as we focus on expanding new solutions.
Learn More
Important Update
ByteScout SDK Sunsetting Notice
Our ByteScout SDK products are sunsetting as we focus on our new & improved solutions.Thank you for being part of our journey, and we look forward to supporting you in this next chapter!
Learning to code has always been a challenging thing to do. If you are a beginner, you can easily get overwhelmed with the types of development methodologies out there.
However, there is one method that you can utilize for better learning and development experience, i.e., Test-driven development(TDD).
Test-driven development(TDD) is one of the popular ways to code and create projects. It revolves around creating tests and then writing the actual code.
Traditional development revolves around creating the code first and then designing a test to validate that the code works. With TDD, you first create the test, see it fail, and then create/change your code until it passes the pre-designed test.
Here, the “test” simply needs to cover a small portion of the logic, like an algorithm. It should not have any side effects like calling an external API to change the data set. And speaking of data sets, you should use mock data in place of data that has the potential to change over time as you run these “tests”.
In this article, we will learn how to do test-driven development in Python. We chose Python because it is simple to learn and implement. However, before we get started with the actual tutorial, let’s explore TDD is detailed below.
Test-driven development is a development philosophy where you need to check the code functionality before writing any “actual” code.
This process ensures that your code is as perfect as possible. With the test code ready, you now know what needs to be included in your code to satisfy those tests. In TDD, major work is done during the test creation.
So, what steps are included in the TDD process? Let’s list them below.
Thoroughly understand the feature or bug that is being requested.
Segment the entire request into smaller ones. Create a test based on each new smaller requirement.
Write the code that will pass the test. If the code fails, rewrite it and run this step again.
Clean up the code using the refactoring process.
Repeat the process for all the other tests.
The above steps can be repeated until you get your intended result.
One more thing that you should be interested in knowing is that test-driven development works great with agile development. They both compliment each other as TDD results in faster development time.
Benefits of Using TDD
Here is a look at some of the key benefits of using TDD (Test Driven Development).
Improved Code Acceptance Rates
Any code you write usually needs to deliver a list of features. When you write your code in segments validating each of these features through separate tests, then the finished product is unlikely to overlook any required feature, hence improving the acceptance rate.
Improves Productivity
Using the TDD process allows you to narrow your focus on small chunks rather than on the entire project at the same time. This will keep you from getting overwhelmed and help become more focused and productive as you try to create code and test them, one small chunk at a time.
Lesser Bugs and Errors
As you tackle the bugs and errors while writing the code, you will face very few bugs or issues when the project is done. This isn’t to say that the finished product will be completely bug-free.
However, if you do notice a bug, you will be able to create and implement a test before attempting to fix the problem, which ensures you won’t have to deal with that bug again.
Increased ROI (Return on Investment)
Following the TDD process, your code will take longer to finish at first. However, when the code is done, it will be far cleaner and have fewer bugs compared to code not written using TDD.
As such, using TDD, you save time in the long run by not having to update or debug as often as you would following conventional methods. Furthermore, as stated by a study done by Eric Elliott – founder of Parallel Drive, the maintenance cost of code made with TDD is half that of code made without TDD.
And so, in the long run, you end up saving in debugging and code maintenance which results in an increased ROI.
Detailed Documentation
All the tests that you perform while creating the code serve as potential documentation to developers. If a developer is unsure how a class or library works, they can go ahead and read through the tests – since TDD tests are written with different scenarios in mind including how you wish to use a particular class.
As such, not only do you end up with far more detailed documentation, but it is getting written as you write the code.
How to do Test-driven development in Python(With Examples)
Before we get started, you need to make sure that you have Python installed on your computer. If you are sure, you are ready to proceed.
Create a parent folder. Inside that folder, you need to create two folders.
One folder is the app itself. Let’s name it calcapp and the other simply as “test.”
Also, to make sure that you can import files from each of the folders, you need to create a file named, “__init__.py” in each of the directories.
Clearly, there are plenty of ways you can do test-driven development. But, for this tutorial, we are going to use the in-built unittest module. It comes pre-loaded with Python.
Now, you need to create a new file named test_calc.py.
For the tutorial, we are going to Windows. For the text editor, we will stick to Sublime Text.
In the tests.py file, we are going to create the following code.
import unittest
class CreateFirstTest(unittest.TestCase):
   def calculator_testing(self):
      calcu = Calculator()
      final = calcu.add(3,4)
      self.assertEqual(7, final)
As you can see, it is easy to create a test. Here we do the following things.
First, we import the unittest module. Next, we create a class for the test itself. Creating a Class can help you separate and manage your tests well.
Now, we define a method that initiates a calculator and does a sum. Lastly, we do a self.assertEqual() function.
To simplify our process of testing test cases, we are going to install nose. You can do it by running the following command.
pip install nose
Once done, it is easy to use.
To execute a single file, you can run the command below.
nosetests test_file.py
That means to make the tests.py file successfully you need to add the command below.
if __name__ == '__main__':
      unittest.main()
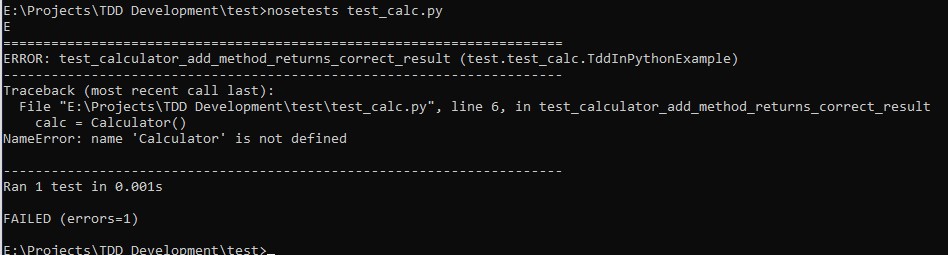
Let’s try to run the tests.py and see what it returns.
In the command prompt, you need to run the following command.
nosetests test_calc.py
As you can see that there is an error saying the Calculator is not defined. This is because of the fact that we have not defined and wrote code for the Calculator. Let’s create a file and name it, “calc.py”
Inside the file, you need to add the code as shown below.
class Calculator(object):
   def add (self, a, b):
      pass
Now, go back to the tests.py and add the following line below “import unittest”
from calcapp.calc import Calculator
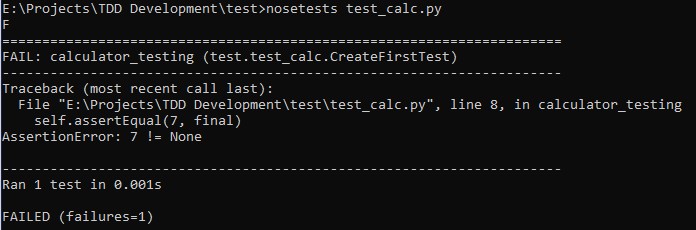
With everything set again, we can again run the nosetest.
From the above screenshot, you can see that it still fails the test. This is because we have not defined the add method yet.
To do so, copy the code below and add it to the calc.py file.
class Calculator(object):
   def add(self, a, b):
      return a+b
Let’s do one more nosetest.
It should successfully pass the test as shown above.
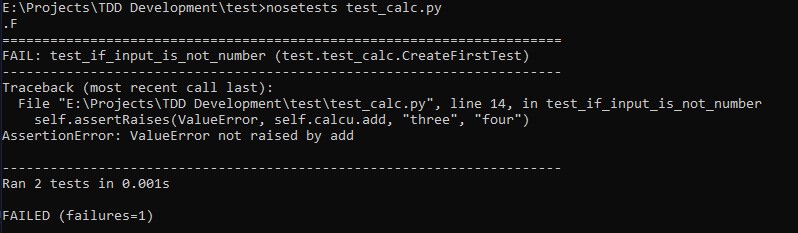
By now, you should now have a proper understanding of how test-driven development works. At the core, we simply need to satisfy the test cases. As a developer, your job is to create test cases for all possible scenarios. For instance, you should also take into consideration that the user can input strings instead of numbers.
Here, we tried to use the assertRaises method to test the condition.
Also, we can move the calculator creation in the setUp method.
def setUp():
   self.calcu = Calculator()
This will help other methods to access the caclu variable.
If you run the nosetest now, it will give you the following error.
To fix it, you need to add the types of input that the program will take from the user.
class Calculator(object):
  def add(self, a, b):
      number_types = (int, float, complex)

      if isinstance(a, number_types) and self.isinstance(b, number_types):
         return a + b
      else:
         raise ValueError
Now, as you can see from the code above, we went forward and tried to check the instance of each of the inputs. If the instance matches the number type of int, long, float, and complex, then we are going to do the addition and return the value. If the input is different than an integer, the function will simply return a ValueError.
To test all possible scenarios, we are going to add two more tests whereas one input is an integer and the other one is not.
We have successfully created a simple function of a calculator, i.e., addition. From here, you can decide to create the other functionalities of the calculator including subtraction, multiplication, and division. You may also go overboard and try to include high-level functionalities such as a log.
Other Ways of Doing Test-Driven Development
Python is a versatile programming language that comes to options. In this section, we will briefly look at those options.
UnitTest
Python’s unittest is the most popular package for creating and testing. If you want a nice output, then the unittest is a good option. It comes in handy if you do not want to install an external package for testing. In our case, we used nosetest for testing.
To use unitttest, you need to simply add the following lines of code to your test file.
if __name__ == '__main__':
   unittest.main()
py.test
Another option that you can use is the py.test. It is a test runner similar to the nosetest that we used in our tutorial. By using it, you will get the output in a separate area with nice details that can help you understand what went wrong.
To install it, you need to use the following command.
$ pip install pytest.
Using it is similar to that of nosetest.
Code Debugging Using Python Debugger
Not every time, you will find TDD to be as effective. As a programmer, you will find yourself stuck, unable to find what is the cause of the test failure.
That’s why you can use another approach where you can do code debugging. You can use the basic print statement in Python and utilize it to know the output at different stages of the program.
If that’s not what you are into, then you can make use of Python Debugger(PDB). It is very useful for debugging high-level code. We leave it to you to explore how to utilize it effectively in your programming.
Conclusion
This leads us to the end of our test-driven development in Python. We hope that you now have a good understanding of TDD using Python. If you have any questions, then do comment below and let us know.
About the Author
ByteScout Team of WritersByteScout has a team of professional writers proficient in different technical topics. We select the best writers to cover interesting and trending topics for our readers. We love developers and we hope our articles help you learn about programming and programmers.
JavaScript is a client side scripting language that runs in browser. Often you would have seen animations on your websites even If they are disconnected...