Our ByteScout SDK products are sunsetting as we focus on expanding new solutions.
Learn More
Important Update
ByteScout SDK Sunsetting Notice
Our ByteScout SDK products are sunsetting as we focus on our new & improved solutions.Thank you for being part of our journey, and we look forward to supporting you in this next chapter!
Launch SWF To Video Scout. It will offer you to extract flash movies from IE, Firefox, Opera web browsers or scan local folders for available flash movies. Check needed options or simply skip this step by clicking No,Thanks button.
You can also open the file you need with File menu > Open Movie From File command or CTRL+O hotkey. The files you like or need to use often can be added to Favorites list using Add to Favorites button under the list of opened movies.
Open and select the SWF file from the list to preview the movie before starting flash to video converter.
To start SWF to AVI wizard, please click Convert To AVI button:
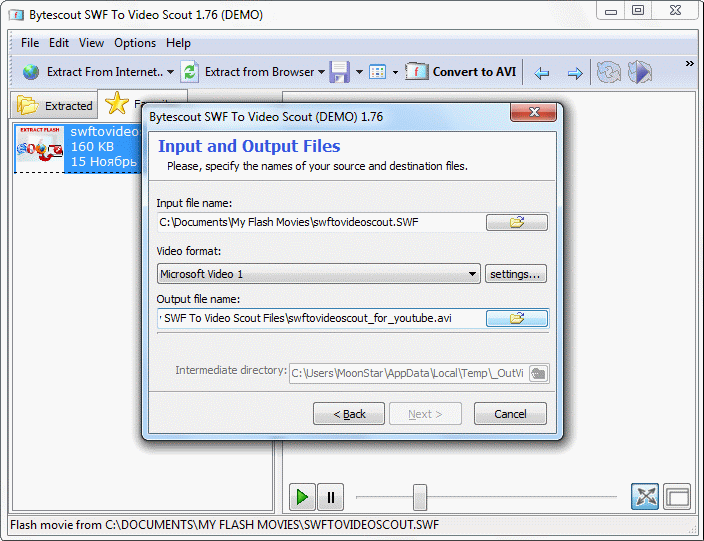
The program will start SWF to AVI conversion wizard:
Click Next and select input SWF and output video file:
Select conversion mode, needed video quality, frame rate, resolution and sound recording options. To make video for further uploading to Youtube, recommended resolutions are 320×240 for small size and 640×480 for medium size. If you want to create and upload HD video, select Custom resolution and set 1280×720 width and height respectively (see screenshot below):
Click Next to start flash to video converter:
Sign in to your YouTube account and click the Upload button . Click Upload Video and select the video file created with SWF to Video Scout. The uploading will start automatically.
Adjust and save an uploaded video settings. Add desription and tags, edit video title if needed and click Save button. You’re done – the video is successfully uploaded to YouTube. You can now see it at My Videos page.
The video is on YouTube and you can share it with the world.
Please watch short demo below – a Flash slideshow converted to YouTube video with SWF to Video Scout.