Our ByteScout SDK products are sunsetting as we focus on expanding new solutions.
Learn More
Important Update
ByteScout SDK Sunsetting Notice
Our ByteScout SDK products are sunsetting as we focus on our new & improved solutions.Thank you for being part of our journey, and we look forward to supporting you in this next chapter!
Heroku is a well-known platform as a service (PaaS) solution, founded in 2007. It is a promising platform for developers as it gives them the ability to deploy and run applications without worrying about the underline infrastructure. The Heroku service offers a robust ecosystem comprised of integrated data services and managed container system.
Heroku’s wide support for programming languages makes it a great choice for the developer community. At the time of writing, it supports programming languages such as Node.js, Java, Ruby, Python, Go programming and PHP. This wide support makes it a polyglot platform.
So, what makes Heroku tick? How does it work? Let’s explore it in detail.
How Heroku Works
Heroku’s is a place for applications to live. At least, that’s what most developers or users will see. The developers utilize Heroku to host apps. They go to the backend of Heroku solutions and create a simple “Heroku” app.
Once done, the code is pushed from the git repository. From there, developers can enjoy seamless application development and deployment. To facilitate the whole process and enable developers to work as seamlessly as possible, developers get access to more than 175+ add-on services. These services include uptime alerts, database services, metrics, automatic backups, and more!
At a high level, Heroku offers developers the ability to deploy applications developed in diverse programming languages.
Git The Transport Mechanism
As Heroku is a platform as a service(PaaS) solution, it requires a transport mechanism to deploy the code. Developers can opt to transfer code via SCP, network shares, or even FTP. However, Heroku utilizes Git as a way of transport. They utilize Git because it allows source control management which is the modern way to manage applications.
For developers, this means that shipping code is easy to Heroku. To connect with your application on Heroku, you need to use SSH.
git@heroku.com: application_name.git
You also need to add a git remote using the following command.
Once set up, you can now easily push and pull code.
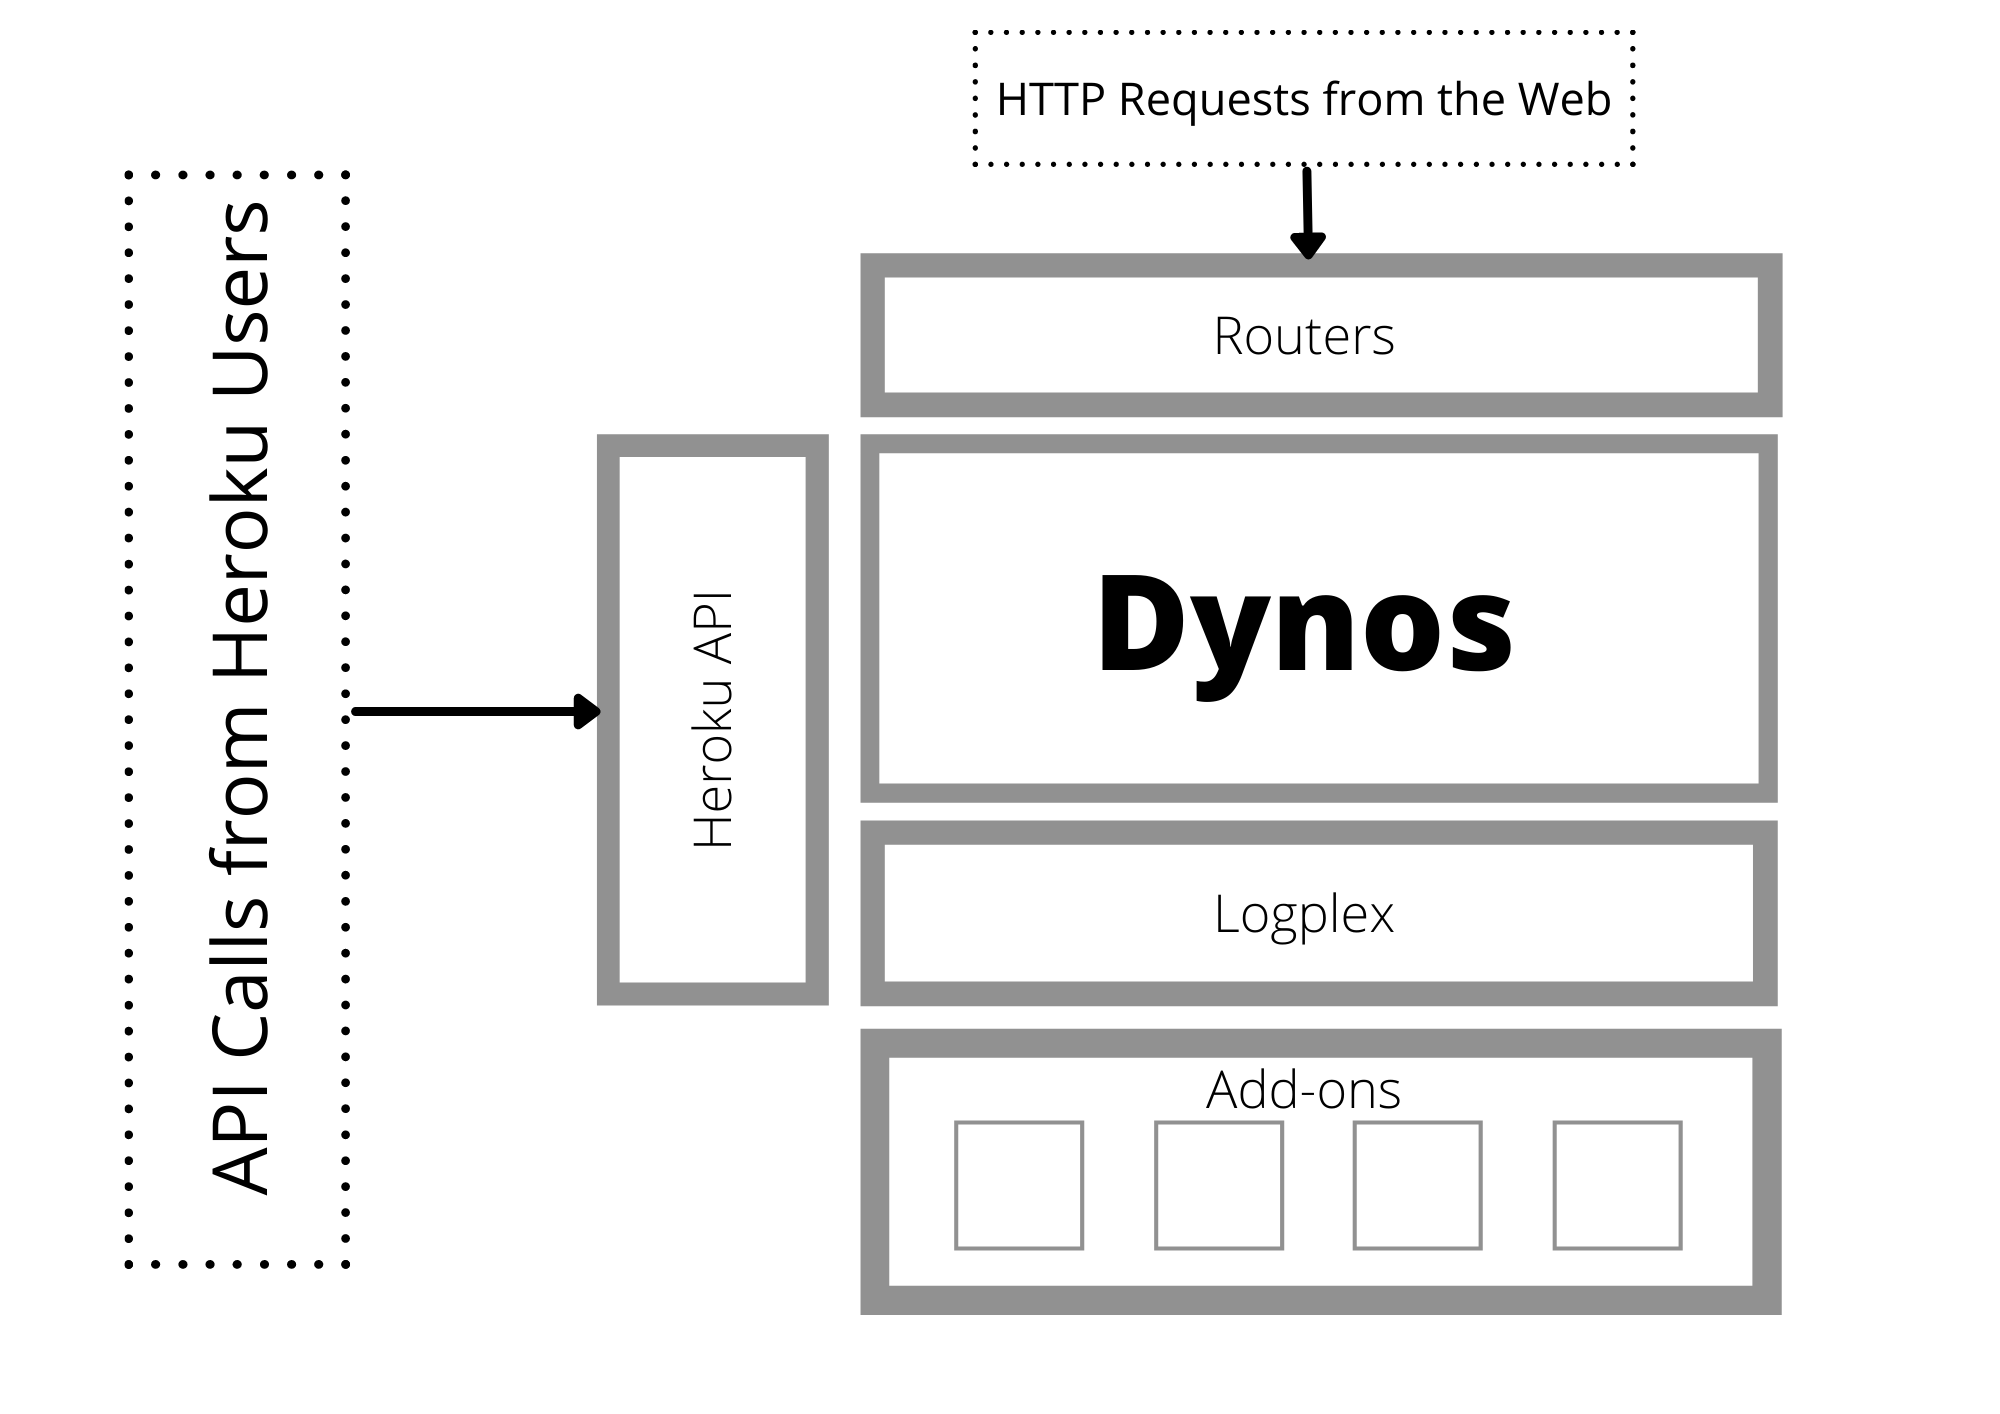
Two Main Components – Routers and Dynos
Heroku comprises multiple key elements. However, two components encapsulate the core idea behind Heroku. These concepts are Routers and Dynos.
Routers take care of user’s requests generated through the web, which are received by the application.
Dynos, on the other hand, tracks the application code 24/7
Let’s first take a look at Dyno
Dyno is a container in Heroku. So, if you deploy an application, Heroku will create a container named “Dyno” and store the application code within it. Dyno’s also act as an instance and hence can be increased when needed by the application. For instance, if the application needs scaling, Heroku can assign more dynos to the application. Each dyno offers 512 MB of physical RAM.
Just like Software-as-a-service(SaaS) solution, PaaS is also billed by the resource you are using. In this case, you are going to get billed by dyno/hour.
The Dyno Manager is responsible for managing multiple dynos. As mentioned earlier, routers play their role when it comes to handling requests from users. The Dyno manager transfers the requests via the Heroku routers to the assigned application. For example, the Heroku routers receive requests for applications A and C; it will transfer the requests to the said application.
But how does it identify the dynos to which the requests need to be sent? Well, in Heroku, each dyno is paired with the application code. Once a developer sends the code to the dyno, it is compiled to “slug.”
Slug is an application pre-packed copy that is optimized for distribution in the dyno. The slug also contains the necessary runtime layer as well.
Heroku is also smart enough to select the correct build pack for the programming language used in the application. If you are using a programming language not supported by Heroku, you can use a custom build pack available via the Elements Marketplace.
Config Vars and Releases
Next comes the config vars. As we know by now, once a slug and build pack is launched, they are assigned to a dyno — a Linux-based container. These dynos can be scaled and hence are a great approach to the needs of the developers.
On top of that, at any given time, developers can deploy a codebase in numerous ways, including staging sites, production sites, and local environments. This means that despite the codebase, there are plenty of deployments to meet the requirements. This is where the configurations come in.
Each deployment must have its own configuration depending on the environment. For instance, if the developer aims to deploy it to Amazon S3, he needs to configure it to include the credentials for performing tasks.
To offer better security and isolation, each deployment has its own config cars. The approach means no errors during deployment handling. It is also helpful when it comes to managing complicated apps.
Next, we have the releases concept.
The release is a combination of the application code slug and the configuration file. The release is also an important part of the Heroku as it is generated as soon as you make a new change. This lets developers quickly go back to a previous release if something goes wrong.
To create a release, the developer needs to use the heroku releases command line.
Addons and Logging
Lastly, we have the add-ons and logging.
Heroku’s add-ons are crucial to the platform as they are basically services that you can install and use with just one click installs. At the time of writing, Heroku offers 175 add-ons spread across 24 categories. As a developer, you can use these add-ons via a free trial. But, if you want to get the most out of the add-ons, it is better to invest.
Logging allows Heroku to simply the whole process. It creates the logs so that routing can benefit too. Heroku utilizes Logplex – a distributed collation and routing solution. To check the logs, you need to type the following command.
$heroku logs –tail
Conclusion
Heroku undoubtedly makes it easy for developers to manage their applications. With a wide variety of programming language support and an impressive way to handle code and application, you will find Heroku to support your development process. In short, you need to focus on the development process while Heroku takes care of the infrastructure.
About the Author
ByteScout Team of WritersByteScout has a team of professional writers proficient in different technical topics. We select the best writers to cover interesting and trending topics for our readers. We love developers and we hope our articles help you learn about programming and programmers.
Internationalization aka i18n is a concept that refers to the development of user interfaces in different languages. The major benefit of supporting multiple languages is...
The point of progressive web apps is to make optimal use of the ever-evolving capabilities of browsers. One such advanced browser capability is to store...