Our ByteScout SDK products are sunsetting as we focus on expanding new solutions.
Learn More
Important Update
ByteScout SDK Sunsetting Notice
Our ByteScout SDK products are sunsetting as we focus on our new & improved solutions.Thank you for being part of our journey, and we look forward to supporting you in this next chapter!
Creating, Formatting Excel with various options using ByteScout Spreadsheet SDK in C# – Part 1
Creating, Formatting Excel with various options using ByteScout Spreadsheet SDK in C# – Part 1
Microsoft Excel is used in almost all types of industries and professions. Bankers, accountants, consultants, analysts, etc. all use an excel on a consistent basis. As a developer, you will often be given a requirement to programmatically generate the interactive excel worksheet either for reporting purposes or for presentation purposes. ByteScout Spreadsheet SDK has provided, in no particular order, and out of box features to formatting and manipulating the excel file.
In this article, we are going to explore the various options available to format the excel by writing a step-by-step program to create Excel C#. It lets developers create rich Excel file from the formatting perspective.
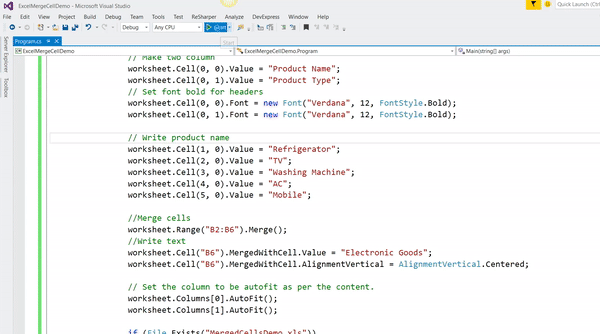
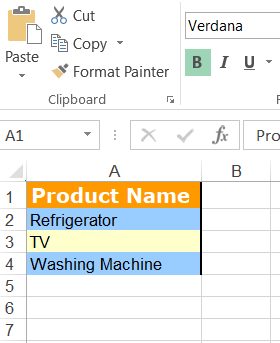
Set two columns – “Product Name” and “Product Type“, set its font and font color and then write some sample text.
// Make two column
worksheet.Cell(0, 0).Value = "Product Name";
worksheet.Cell(0, 1).Value = "Product Type";
// Set font bold for headers
worksheet.Cell(0, 0).Font = new Font("Verdana", 12, FontStyle.Bold);
worksheet.Cell(0, 1).Font = new Font("Verdana", 12, FontStyle.Bold);
// Write product name
worksheet.Cell(1, 0).Value = "Refrigerator";
worksheet.Cell(2, 0).Value = "TV";
worksheet.Cell(3, 0).Value = "Washing Machine";
worksheet.Cell(4, 0).Value = "AC";
worksheet.Cell(5, 0).Value = "Mobile";
Merge the cells. column header “Product Type” is at “B1” position. So, merging of cells will start from “B2” to “B6” as we enter 5 products in the file.
//Merge cells
worksheet.Range("B2:B6").Merge();
Write the text in merged cells and align its text as centered.
Set the width of a column to be automatically fit as per the column content.
// Set the column to be autofit as per the content.
worksheet.Columns[0].AutoFit();
worksheet.Columns[1].AutoFit();
Check if the same file name already exists in the application’s bin\Debug folder. If exists then first delete it.
// delete MyNewExcelFile file if exists already
if (File.Exists("MergedCellsDemo.xls")){
File.Delete("MergedCellsDemo.xls");
}
Generate output file
// Save document
document.SaveAs("MergedCellsDemo.xls");
* Create an Excel file with page break (horizontal and vertical) in a worksheet:
This feature of Excel is reasonably useful when there is a large number of data in excel and you want to print it. So when you print, your content on the sheet will automatically be divided into the pages. But you know what you can control this automatic page breaks. Yes, you can set your own page breaks programmatically. You can easily achieve this requirement using ByteScout Spreadsheet.
In this program, we will insert horizontal and vertical page breaks in a worksheet.
Step-1: Create a new C# console application project as shown in the first demo program.
Step-2: Then add Bytescout.Spreadsheet.dll file as a reference to your project.
Step-3: Include the following namespaces in the Program.cs file.
using System.IO;
using System.Diagnostics;
using System.Drawing;
using Bytescout.Spreadsheet;
using Bytescout.Spreadsheet.Structures;
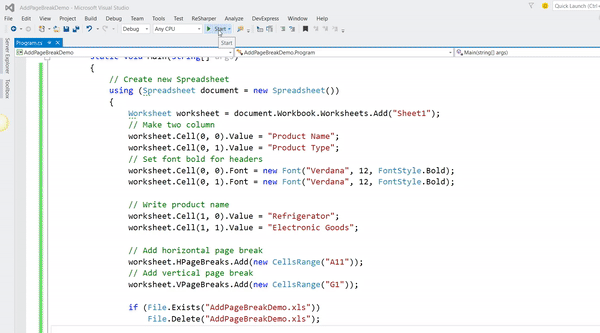
Step-4: Add the following code snippet.
class Program
{
	static void Main(string[] args)
	{
		// Create new Spreadsheet
		using (Spreadsheet document = new Spreadsheet())
		{
			Worksheet worksheet = document.Workbook.Worksheets.Add("Sheet1");

			// Make two column
			worksheet.Cell(0, 0).Value = "Product Name";
			worksheet.Cell(0, 1).Value = "Product Type";

			// Set font bold for headers
			worksheet.Cell(0, 0).Font = new Font("Verdana", 12, FontStyle.Bold);
			worksheet.Cell(0, 1).Font = new Font("Verdana", 12, FontStyle.Bold);

			// Write product name
			worksheet.Cell(1, 0).Value = "Refrigerator";
			worksheet.Cell(1, 1).Value = "Electronic Goods";

			// Add horizontal page break
			worksheet.HPageBreaks.Add(new CellsRange("A11"));
			// Add vertical page break
			worksheet.VPageBreaks.Add(new CellsRange("G1"));

			if (File.Exists("AddPageBreakDemo.xls"))
				File.Delete("AddPageBreakDemo.xls");

			// Save document
			document.SaveAs("AddPageBreakDemo.xls");
			//Close Spreadsheet
			document.Close();

			// Open generated XLS document
			Process.Start("AddPageBreakDemo.xls");
		}
	}
}
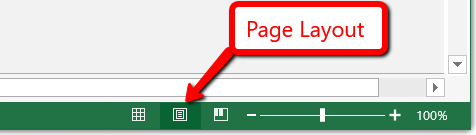
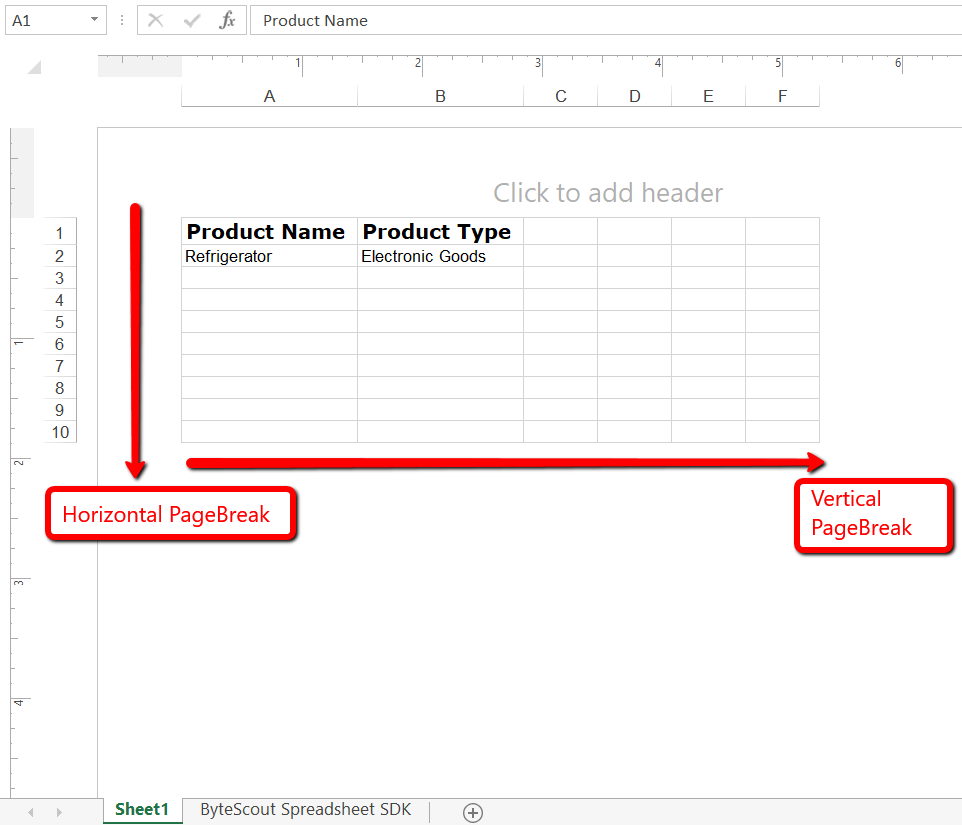
When you run this program, it opens Excel file in Normal view. But when you click on “Page Layout” at the bottom-right side of excel as shown in the following image.
You will be able to see our own page breaks that we set programmatically using the following code.
// Add horizontal page break
worksheet.HPageBreaks.Add(new CellsRange("A11"));
// Add vertical page break
worksheet.VPageBreaks.Add(new CellsRange("G1"));
And it would look something like this:
Here’s the demo output:
* Create a formatted Excel worksheet in C#:
You will often have to give a requirement to programmatically generate the formatted excel worksheet for some sales projections or for any kind of reporting purpose. Fortunately, making a formatted excel worksheet is much simple with ByteScout Spreadsheet SDK.
In this program, we will see how to create an Excel file that would look like this:
Step-1: Create a new C# console application project.
Step-2: Then add Bytescout.Spreadsheet.dll file as a reference to your project.
Step-3: Include the following namespaces in the Program.cs file.
using System.Diagnostics; using System.IO; using System.Drawing; using Bytescout.Spreadsheet; using Bytescout.Spreadsheet.Constants;
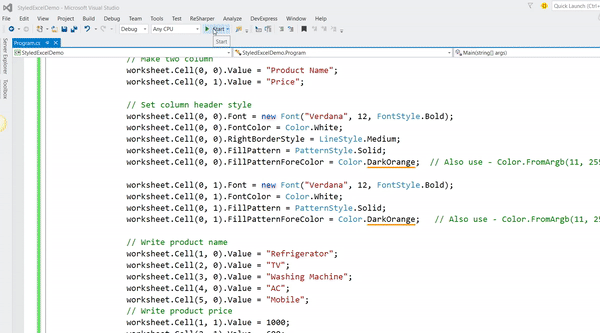
Step-4: Add the following code snippet.
class Program
{
	static void Main(string[] args)
	{
		// Create new Spreadsheet
		using (Spreadsheet document = new Spreadsheet())
		{
			Worksheet worksheet = document.Workbook.Worksheets.Add("Sheet1");
			// Make two column
			worksheet.Cell(0, 0).Value = "Product Name";
			worksheet.Cell(0, 1).Value = "Price";

			// Set column header style
			worksheet.Cell(0, 0).Font = new Font("Verdana", 12, FontStyle.Bold);
			worksheet.Cell(0, 0).FontColor = Color.White;
			worksheet.Cell(0, 0).RightBorderStyle = LineStyle.Medium;
			worksheet.Cell(0, 0).FillPattern = PatternStyle.Solid;
			worksheet.Cell(0, 0).FillPatternForeColor = Color.DarkOrange;  // Also use - Color.FromArgb(11, 255, 255);

			worksheet.Cell(0, 1).Font = new Font("Verdana", 12, FontStyle.Bold);
			worksheet.Cell(0, 1).FontColor = Color.White;
			worksheet.Cell(0, 1).FillPattern = PatternStyle.Solid;
			worksheet.Cell(0, 1).FillPatternForeColor = Color.DarkOrange;   // Also use - Color.FromArgb(11, 255, 255);

			// Write product name
			worksheet.Cell(1, 0).Value = "Refrigerator";
			worksheet.Cell(2, 0).Value = "TV";
			worksheet.Cell(3, 0).Value = "Washing Machine";
			worksheet.Cell(4, 0).Value = "AC";
			worksheet.Cell(5, 0).Value = "Mobile";
			// Write product price
			worksheet.Cell(1, 1).Value = 1000;
			worksheet.Cell(2, 1).Value = 600;
			worksheet.Cell(3, 1).Value = 500;
			worksheet.Cell(4, 1).Value = 900;
			worksheet.Cell(5, 1).Value = 800;

			for (int i = 1; i <= 5; i++)
			{
				worksheet.Cell(i, 0).FillPattern = PatternStyle.Solid;
				worksheet.Cell(i, 0).RightBorderStyle = LineStyle.Medium;
				worksheet.Cell(i, 1).FillPattern = PatternStyle.Solid;
				worksheet.Cell(i, 1).NumberFormatString = "0.00";
				if (i % 2 == 0)
				{
					worksheet.Cell(i, 0).FillPatternForeColor = Color.LightYellow;
					worksheet.Cell(i, 1).FillPatternForeColor = Color.LightYellow;
				}
				else
				{
					worksheet.Cell(i, 0).FillPatternForeColor = Color.LightBlue;
					worksheet.Cell(i, 1).FillPatternForeColor = Color.LightBlue;
				}
			}

			worksheet.Columns[0].AutoFit();
			worksheet.Columns[1].AutoFit();

			if (File.Exists("InteractiveExcelDemo.xls"))
				File.Delete("InteractiveExcelDemo.xls");

			//Save document
			document.SaveAs("InteractiveExcelDemo.xls");
			//Close Spreadsheet
			document.Close();

			// Open generated XLS document
			Process.Start("InteractiveExcelDemo.xls");
		}
	}
}
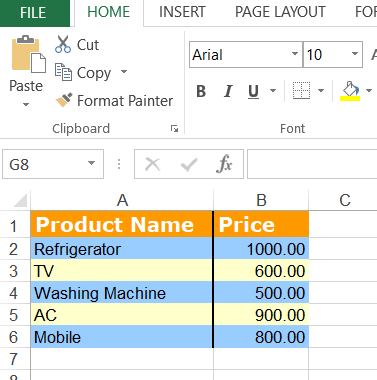
Here’s the output:
Let’s try to understand the above code.
In the above code, we simply create an Excel which contains data in tabular format with two column – “Product Name” and “Price”. So first we set the header style. We set the header text to bold with orange background and white font color.
// Set column header style worksheet.Cell(0, 0).Font = new Font("Verdana", 12, FontStyle.Bold); worksheet.Cell(0, 0).FontColor = Color.White; worksheet.Cell(0, 0).RightBorderStyle = LineStyle.Medium; worksheet.Cell(0, 0).FillPattern = PatternStyle.Solid; worksheet.Cell(0, 0).FillPatternForeColor = Color.DarkOrange; // Also use - Color.FromArgb(11, 255, 255);
And then in the table row data, we set the alternate background color to light yellow and light blue. Here we also format our price column using the following code.
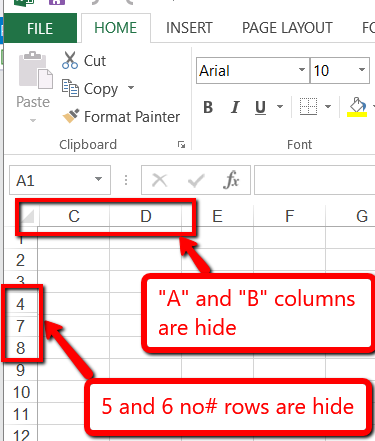
* Create excel worksheet with hidden rows/columns in C#
Assume that you would have given an excel file with so many columns for analysis. In that type of situation, it would be really helpful to hide some unwanted columns or rows. In this program, we will be going to see how to create an excel file with some hidden rows/columns.
Step-1: Create a new C# console application project.
Step-2: Then add Bytescout.Spreadsheet.dll file as a reference to your project.
Step-3: Include the following namespaces in the Program.cs file.
using System.Diagnostics; using System.IO; using Bytescout.Spreadsheet
Step-4: Add the following code snippet.
class Program
{
	static void Main(string[] args)
	{
		using (Spreadsheet document = new Spreadsheet())
		{
			Worksheet worksheet = document.Workbook.Worksheets.Add("Sheet1");

			// Hide first two columns
			worksheet.Columns[0].Hidden = true;
			worksheet.Columns[1].Hidden = true;

			// Hide 4th and 5th no# of rows
			worksheet.Rows[4].Hidden = true;
			worksheet.Rows[5].Hidden = true;

			if (File.Exists("HideRowColumnDemo.xls"))
				File.Delete("HideRowColumnDemo.xls");
			//Save document
			document.SaveAs("HideRowColumnDemo.xls");

			//Close Spreadsheet
			document.Close();

			// Open generated XLS document
			Process.Start("HideRowColumnDemo.xls");
		}
	}
}
If you run the application, the final Excel file will look like this:
As you can see in the above code snippet which itself is self-explanatory where we hide column “A” and “B” and then hide row no# 4 and 5 using the following code.
// Hide first two columns worksheet.Columns[0].Hidden = true; worksheet.Columns[1].Hidden = true;
// Hide 4th and 5th no# of rows worksheet.Rows[4].Hidden = true; worksheet.Rows[5].Hidden = true;
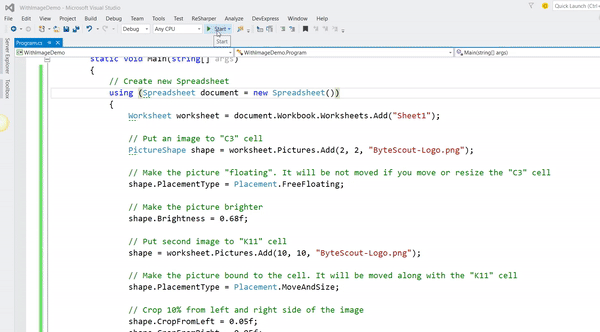
* Add / manipulate images in excel worksheet in C#
In this program, we will see how to add/manipulate images in an excel file. Explanation purpose, we have used ByteScout logo in the worksheet and will see the different options to manipulate it.
Step-1: Create a new C# console application project.
Step-2: Then add Bytescout.Spreadsheet.dll file as a reference to your project.
Step-3: Include the following namespaces in the Program.cs file.
using System.Diagnostics; using System.IO; using System.Drawing; using Bytescout.Spreadsheet; using Bytescout.Spreadsheet.MSODrawing;
Step-4: Add the following code snippet.
class Program
{
	static void Main(string[] args)
	{
		// Create new Spreadsheet
		using (Spreadsheet document = new Spreadsheet())
		{
			Worksheet worksheet = document.Workbook.Worksheets.Add("Sheet1");

			// Put an image to "C3" cell
			PictureShape shape = worksheet.Pictures.Add(2, 2, "ByteScout-Logo.png");

			// Make the picture "floating". It will be not moved if you move or resize the "C3" cell
			shape.PlacementType = Placement.FreeFloating;

			// Make the picture brighter
			shape.Brightness = 0.68f;

			// Put second image to "K11" cell
			shape = worksheet.Pictures.Add(10, 10, "ByteScout-Logo.png");

			// Make the picture bound to the cell. It will be moved along with the "K11" cell
			shape.PlacementType = Placement.MoveAndSize;

			// Crop 10% from left and right side of the image
			shape.CropFromLeft = 0.05f;
			shape.CropFromRight = 0.05f;

			if (File.Exists("WithImageDemo.xls"))
				File.Delete("WithImageDemo.xls");

			// Save document
			document.SaveAs("WithImageDemo.xls");

			//Close Spreadsheet
			document.Close();

			// Open generated XLS document
			Process.Start("WithImageDemo.xls");
		}
	}
}
If you run the application, the final Excel file will look like this:
Let’s try to understand the above code.
In the above code, we have added “ByteScout logo” at two locations. First, put an image to “C3” cell using the following code.
// Put an image to "C3" cell PictureShape shape = worksheet.Pictures.Add(2, 2, "ByteScout-Logo.png");
Set the picture brightness and make the picture “floating” by setting the PlacementType property. It means that the image will not be moved if you move or resize the “C3” cell.
// Make the picture brighter shape.Brightness = 0.68f;
// It will be not moved if you move or resize the "C3" cell shape.PlacementType = Placement.FreeFloating;
Put an image to “K11” cell using the following code.
// Put second image to "K11" cell shape = worksheet.Pictures.Add(10, 10, "ByteScout-Logo.png");
In this case, we make the picture “MoveAndSize” by setting the PlacementType property. It means that image will be moved along with the “K11” cell. Here we also crop the image from the left and right.
// Make the picture bound to the cell. It will be moved along with the "K11" cell shape.PlacementType = Placement.MoveAndSize;
// Crop 10% from left and right side of the image shape.CropFromLeft = 0.05f; shape.CropFromRight = 0.05f;
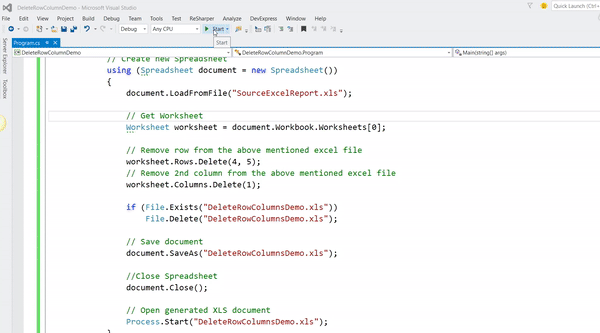
* Delete rows/columns from excel worksheet in C#
In this program, we will be going to see that how can programmatically remove the rows/columns from the existing file. As shown in the below image, assume that you want to remove the “Price” column and last two rows from the file.
The final Excel file would look something like this:
Step-1: Create a new C# console application project.
Step-2: Then add Bytescout.Spreadsheet.dll file as a reference to your project.
Step-3: Include the following namespaces in the Program.cs file.
using System.Diagnostics; using System.IO; using Bytescout.Spreadsheet;
Step-4: Add the following code snippet.
class Program
{
static void Main(string[] args)
{
using (Spreadsheet document = new Spreadsheet())
{
document.LoadFromFile("SourceExcelReport.xls");

// Get Worksheet
Worksheet worksheet = document.Workbook.Worksheets[0];

// Remove row from the above mentioned excel file
worksheet.Rows.Delete(4, 5);
// Remove 2nd column from the above mentioned excel file
worksheet.Columns.Delete(1);

if (File.Exists("DeleteRowColumnsDemo.xls"))
File.Delete("DeleteRowColumnsDemo.xls");

// Save document
document.SaveAs("DeleteRowColumnsDemo.xls");

//Close Spreadsheet
document.Close();

// Open generated XLS document
Process.Start("DeleteRowColumnsDemo.xls");
}
}
}
If you run the application, the final Excel file will look like this:
In this part-1 article, we’ve explored different features for formatting and manipulating the Excel. ByteScout Spreadsheet SDK has many more features and we will explore some more features in the next article.
Till then stay tuned and stay updated with us!
Happy Coding 🙂
About the Author
ByteScout Team of WritersByteScout has a team of professional writers proficient in different technical topics. We select the best writers to cover interesting and trending topics for our readers. We love developers and we hope our articles help you learn about programming and programmers.
The financial services sector in the US is undergoing a dramatic technology-led evolution that is changing the landscape of the entire industry. Some of the...