Our ByteScout SDK products are sunsetting as we focus on expanding new solutions.
Learn More
Important Update
ByteScout SDK Sunsetting Notice
Our ByteScout SDK products are sunsetting as we focus on our new & improved solutions.Thank you for being part of our journey, and we look forward to supporting you in this next chapter!
Amazon Web Services (AWS) is one of the largest and most well-known on-demand cloud computing platforms available. Part of the reason for their popularity is that they have an easily scalable set of web hosting platforms, including storage, networking, database services, among many others. Typically these services are not visible to end-users but can provide a framework for hosting dynamic processing tools that you need for your site, and these services can be connected to many applications through APIs
The AWS RDS product (Relational Database Service) enables you to set up, operate, and manage your database remotely. Many of the tasks are automated, leaving you to be able to the freedom to work on applications instead of worrying about your data.
This tutorial should help you connect your MySQL database to AWS, as well as teach you a few basic administrative tasks.
Setting up an Account
The first thing you’re going to need to do is to get set up with an Amazon Account. The good news is that getting started is free. This will give you 750 instance hours, and 20 gigs each of the database and backup storage. If you are running a large enterprise site, this will clearly not be enough but it’s good enough to get your feet wet before you plunge in. For the purposes of this tutorial, we will be covering setting up a development database. (Note, you will be asked for a credit card, but you will not be charged unless you go above the specified limits. There also might be a delay as they need to check the account).
Once you are in, the first thing you will need to do is to set up a database instance. Instances are similar to databases, however, in reality, they are a set of memory structures that enable you to manage your database files. An instance can contain multiple databases. You can use the same set of applications that you would normally use to gain access to a standalone database. Using AWS instances, give you access to the command line tools to manage each of the databases within that instance.
Let’s get started.
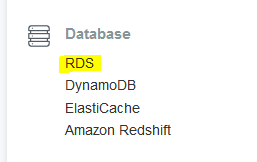
When you first get in, you will a large menu of services provided through AWS, you might want to familiarize yourself with this, but for now, in the third section down on the left side of your screen, you will see “Databases” If you click on “RDS” this will open the RDS console.
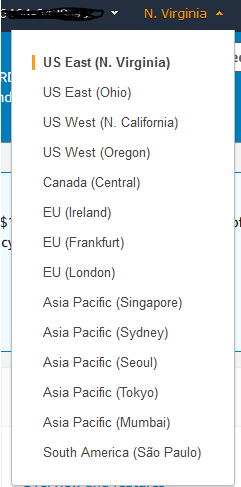
First, you will need to select the geographic region where you wish your instance to live from the menu at the top. Each one resides in one of Amazon’s independent data centers. Where you choose to set up your instance is up to you. Note: AWS may automatically assign you a region based on your geographic area. You can view and/or modify this from the top of the screen here:
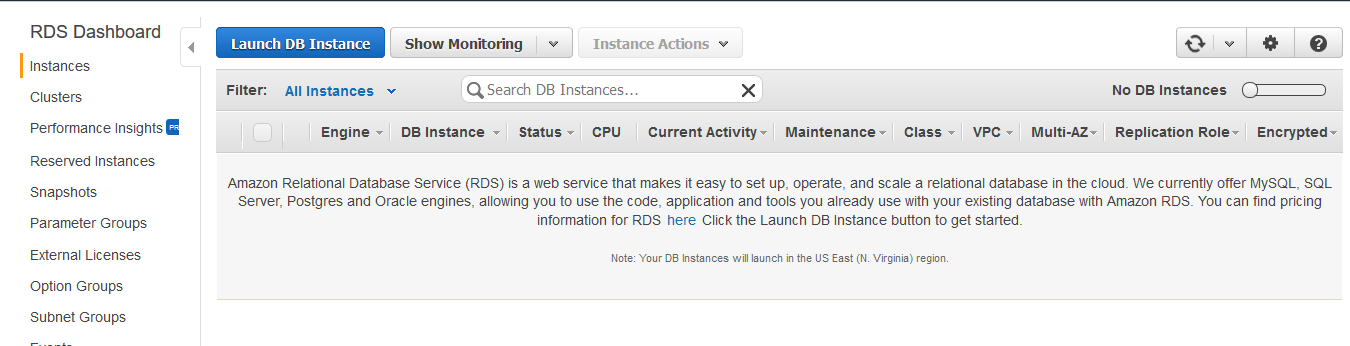
Click on Instances on the left and you will see something that looks like this:
Create your instance by clicking on “Launch DB Instance.” At this point, you need to configure this instance to be configured for a MySQL database. Click on the little icon that shows MySQL and then click on “Select” and then choose the “MySQL Community Edition.”
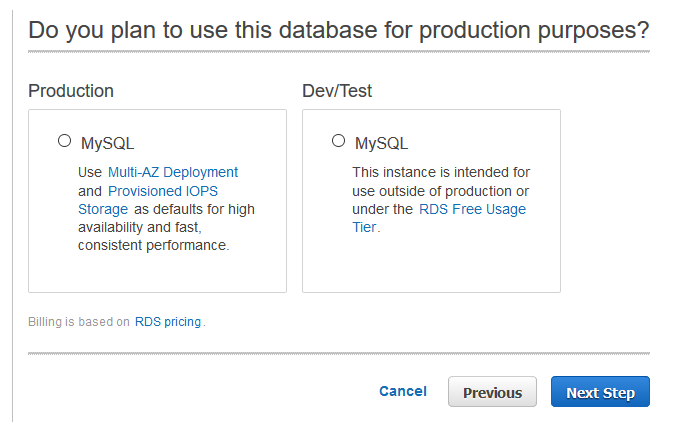
You will then see two options, “Production” and “Dev/Test”.
The first section is for production servers. You will likely want to examine this option at a later point, however as it’s never a good idea to develop or test in a production environment, for now, we are working on simply getting a development/test environment running.
Under the second section, labeled Dev/Test, simply choose MySQL, and then click on “Next Step.” This will get you started with your development copy of your database.
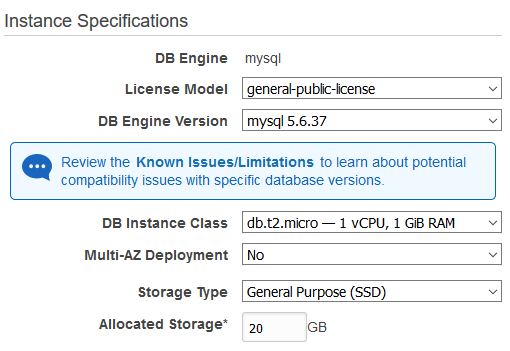
After you’ve done this, you will be brought to a screen to configure your DB Instance:
The first field, the license, you don’t need to worry about. Since you are using MySQL, which is free and open, you only have the option of choosing a GPL license.
In the next field, choose which version of the MySQL you are using. You have a few options here. This is important as there is some variation in the way that different versions run. This tutorial is operating under the assumption that is running the most recent version, which at the time of this writing is MySQL 5.7. If you need more information about its functionality, you can check the MySQL documentation on the official site.
Under Instance class, choose “db.t2.micro — 1vCPU, 1 GIB RAM.” (If you want more information about different instance classes, you can look this up on the AWS website)
You don’t need to worry too much about the other fields at this point. For setting up your development database, you don’t need to set up Multi-Deployment, so choose “no”. For storage, “general purpose” is fine for now. After this you will need to determine how much storage you need. What you choose is dependent on the size of the database you are working with. Leave it at 20, unless you wish to start paying
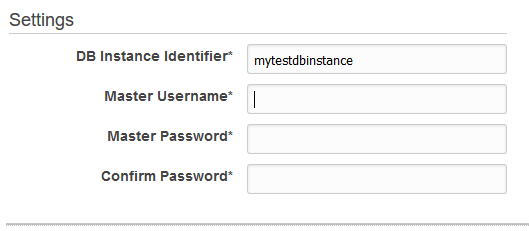
After this, you just need to set up your access settings.
Create a unique name for your database instance, and then set up a master login and password. You can set this up to be between 8 and 41 ASCII characters (i.e. alphanumeric and special characters, with a few obvious exceptions, such as quotes and slashes).
Once all of these necessary settings are configured, click “next” and you will be brought to an advanced settings page. For the most part, you will probably not need to make any changes, but you verify the existing settings to make sure they are compatible with your needs. You can create your own database name if you wish, otherwise, it will be set for you. You may want to consider changing the number of days you want to retain backups (these are replaced and removed on a regular basis). Typically one day is fine, but you may wish to revisit this at some point in the future.
After you have verified all of the settings on this page, click “Launch DB Instance.” It may take a few minutes for your instance to be launched, depending on the size you have selected. You can view your instance while this is occurring by clicking on “View your DB Instances.”
MySQL Client
Okay, now you have a DB instance set up on AWS. At this point, there’s no way to view or manage your databases until you have some sort of interface or client. There are a number of different tools you can use for this. Let’s look at a couple.
MySQL Utility
If you are comfortable working from a command-line, you can use the MySQL Utility.
You can connect to your DB instance with a command similar to the following
mysql -h instancename.123456789012.us-east-1.rds.amazonaws.com -P 3306 -u mymasteruser -p
As an explanation, the text that follows the -h (or the host), is your DNS name and your instance. The -P is your port (which in most cases, 3306), and -u is your username. By adding -p it will prompt you for your password upon entering.
At this point you will be taken to the MySQL Monitor output, which looks something like this:
Welcome to the MySQL monitor. Commands end with; or \g.
Your MySQL connection id is 350
Server version: 5.6.27-log MySQL Community Server (GPL)
Type ‘help;’ or ‘\h’ for help. Type ‘\c’ to clear the buffer.
mysql>
If you are familiar with running MySQL from the command-line you should already be familiar with this interface, and you can proceed as you normally do.
MySQL Workbench
For those of you (like me) who prefer a graphical interface for managing your MySQL database, you will likely want a utility that enables you to view and manage different aspects of your database. One of the more popular clients is MySQL Workbench which is a free download from the MySQL Website. It is available for Windows, Mac, and Linux.
Important Note: Due to security limitations for AWS, when you set up your security groups on AWS, to be able to use MySQL Workbench, you will need to the same computer you used to set up your instance. If you wish to use different computers, you will need to modify your security settings in the AWS console to allow different devices.
Once you have MySQL Workbench setup (or if you already have it installed; you may have already been using it on a local database), you’ll need to make a new database connection. In Workbench, click on the “Database” menu item at the top of the screen, and then click on the plus sign to create and choose “Connect to Database” to set up a new connection (Workbench allows you to set up multiple connections). Give your connection a name that you will recognize, choose a connection method (typically TCP/IP, however, there are other methods that can be used, such as an SSH connection if you choose to set it up on AWS)
In the dialog box that appears, under “hostname” you will need to enter the hostname that you created for your instance. If you go to your instances in the AWS RDB Dashboard, you will see this listed as the “endpoint” under your listed instance. For the port, enter “3306” and then your username. If you wish, you can set the password in the MySQL Workbench vault, however, you can leave this blank and it will prompt you each time you attempt to connect.
After you have connected, you can use the suite of tools available in Workbench to create your database, run queries, manage data, create backups, etc. There are also some nice features such as creating ERDs (Entity-Relationship Diagrams) either from an existing database or you can create an SQL dump directly from one.
Managing your instances
At any point, you can view and manage your instances within the AWS console. Simply login into AWS, go to the RDS Dashboard, much like you did when you were setting up the connection, choose instances from the menu on the left, and you will be able to see any existing instances that you have created.
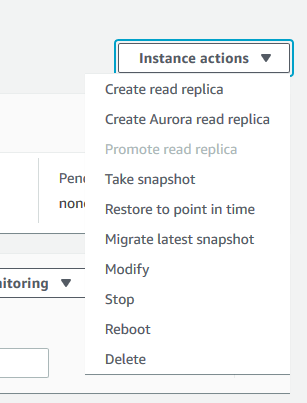
If you choose “Instance Actions” on the lower-left section of the page, you have options to see the details, take a snapshot of your instance, and modify your instance, should any of the information entered earlier change, and look at the statistics.
There are times when you may wish to delete an instance. While you are getting used to working within AWS, you may wish to run through these processes several times to familiarize yourself with the interface and how it works. This is actually a good idea, as it’s better to understand how something works (particularly while in development) before you go ahead and launch a production database. Also while in the process, you may end up with a half-built instance or a database that is no longer being used.
For this reason, it’s considered a good practice to clean out unused instances, particularly if you start using up a lot of space. Remember, while we are working in a free environment, at any point where you may be using more than the allotted 20 Gb that AWS provides, you may bring yourself into territory where you will need to pay to keep using the service. You will get charged for each instance you maintain.
If at any point you wish to delete an instance, from the same drop-down menu, choose “Delete.” Amazon will ask you if you wish to create a final snapshot. In most cases, you will choose “No” (to avoid incurring further space charges), check on the acknowledgment box, and click “delete.” This may take a few minutes.
Now that you have connected your MySQL database with AWS you can move forward to developing and launching your applications. Good luck!
About the Author
ByteScout Team of WritersByteScout has a team of professional writers proficient in different technical topics. We select the best writers to cover interesting and trending topics for our readers. We love developers and we hope our articles help you learn about programming and programmers.
The PDF (Portable Document Format) is one of the most important file formats. It is heavily used in various companies and industries for various purposes...